The ElevenLabs WordPress audio embed is an Audio Native script that converts published article text into a streamable AI-voiced player on any WordPress post. It detects content inside semantic article tags, generates narration using a chosen ElevenLabs voice, and regenerates audio automatically when posts are edited, with no manual file uploads required.
Adding an ElevenLabs WordPress audio embed to your blog posts lets every article double as a podcast episode - without you recording a single word. Visitors land on a post, see an audio player, and press play to hear a natural AI voice read the entire article while they commute, cook, or scroll through their phone. For bloggers and publishers running WordPress, this is the fastest path from written content to listenable content because Audio Native handles the text-to-speech conversion automatically once you drop in a code snippet.
This guide walks through the complete WordPress integration process for ElevenLabs Audio Native. You will set up the embed code, configure a voice that matches your brand, customize the player appearance to fit your theme, and handle the WordPress-specific details that the general documentation glosses over - caching plugins, page builders, block editor quirks, and performance tuning. The companion ElevenLabs Voice Isolator and Conversational AI Agents features live in the same dashboard, so you can branch into either later without leaving your account. Whether you run a personal blog or a multi-author publication, the setup takes about 20 minutes and works with every major WordPress theme and hosting provider.
If you have not used ElevenLabs before, start with the Getting Started with ElevenLabs guide to create your account and explore the platform, then come back here for the WordPress-specific setup. The full ElevenLabs WordPress audio embed configuration is covered in the official Audio Native documentation.
How the ElevenLabs WordPress Audio Embed Works
The ElevenLabs WordPress audio embed (Audio Native) is an automatic article-to-audio conversion tool that drops directly into your WordPress site. Instead of generating audio files manually and uploading them to each post, Audio Native reads the text content on any page where its embed script is present and creates a voiced version using ElevenLabs AI voices. The audio player appears on the page, and visitors press play to listen.
How it works in WordPress:
- You generate an embed code snippet from your ElevenLabs dashboard
- You add that snippet to WordPress - either site-wide through a plugin or manually per post
- Audio Native detects the article text inside your WordPress post content area
- A player widget renders on the page and visitors can listen to the full article
The integration is particularly well-suited to WordPress because most themes use semantic HTML with <article> tags that Audio Native can detect automatically. You do not need to configure content selectors for the vast majority of WordPress themes - the embed just works out of the box, and longer-form scripts can still be staged inside the ElevenLabs Voiceover Studio workspace when you want finer control over pacing.
Key benefits for WordPress publishers:
- Zero production overhead. Publish a post, and the audio version generates itself. No recording, no editing, no file management.
- Automatic updates. Edit a post, and Audio Native regenerates the audio to match the new text. No need to re-record.
- Theme-agnostic. Works with Astarter themes, GeneratePress, Kadence, Flavor, Divi, Elementor templates, and custom themes.
- Analytics included. Track plays, listen duration, and per-post performance from the ElevenLabs dashboard.
Tools You Will Need
WordPress site. Self-hosted WordPress.org with admin access. WordPress.com Business or eCommerce plans also work since they allow plugin installation and custom code. Free and Personal WordPress.com plans do not support the necessary code injection.
ElevenLabs account on Creator plan or above. Audio Native is available starting at the Creator plan ($22/month with 100,000 characters) - confirm tier coverage on the ElevenLabs pricing page. The free and Starter plans do not include Audio Native access. The 100,000 character quota translates to roughly 100 to 120 minutes of generated audio per month - enough for a blog publishing 8 to 12 posts of average length. See the ElevenLabs API quota notes for how character counting works.
A header/footer injection plugin (recommended). While you can add the embed code by editing theme files directly, a plugin like WPCode (formerly Insert Headers and Footers) makes the process safer and survives theme updates. This guide covers both methods.
Prerequisites
Before starting the setup, confirm these items are in place:
-
WordPress admin access. You need the ability to install plugins or edit theme files. Editor-level access is not sufficient.
-
Audio Native enabled on your ElevenLabs plan. Log in to your ElevenLabs dashboard and confirm you can see the Audio Native section in the sidebar. If it is missing, your plan may need an upgrade.
-
A voice selected for your site. Browse the ElevenLabs Voice Library and choose the voice you want narrating your articles. You can change this later, but switching voices regenerates all existing audio and consumes your character quota, so it is worth picking carefully up front.
-
Caching plugin access. If your site uses WP Rocket, W3 Total Cache, WP Super Cache, LiteSpeed Cache, or any other caching plugin, you will need to clear the cache after adding the embed code. Know how to do that before you begin.
Setting Up Audio Native
The setup has three phases: generating the embed code in ElevenLabs, adding it to WordPress, and configuring the default settings.
Step 1: Generate the Embed Code
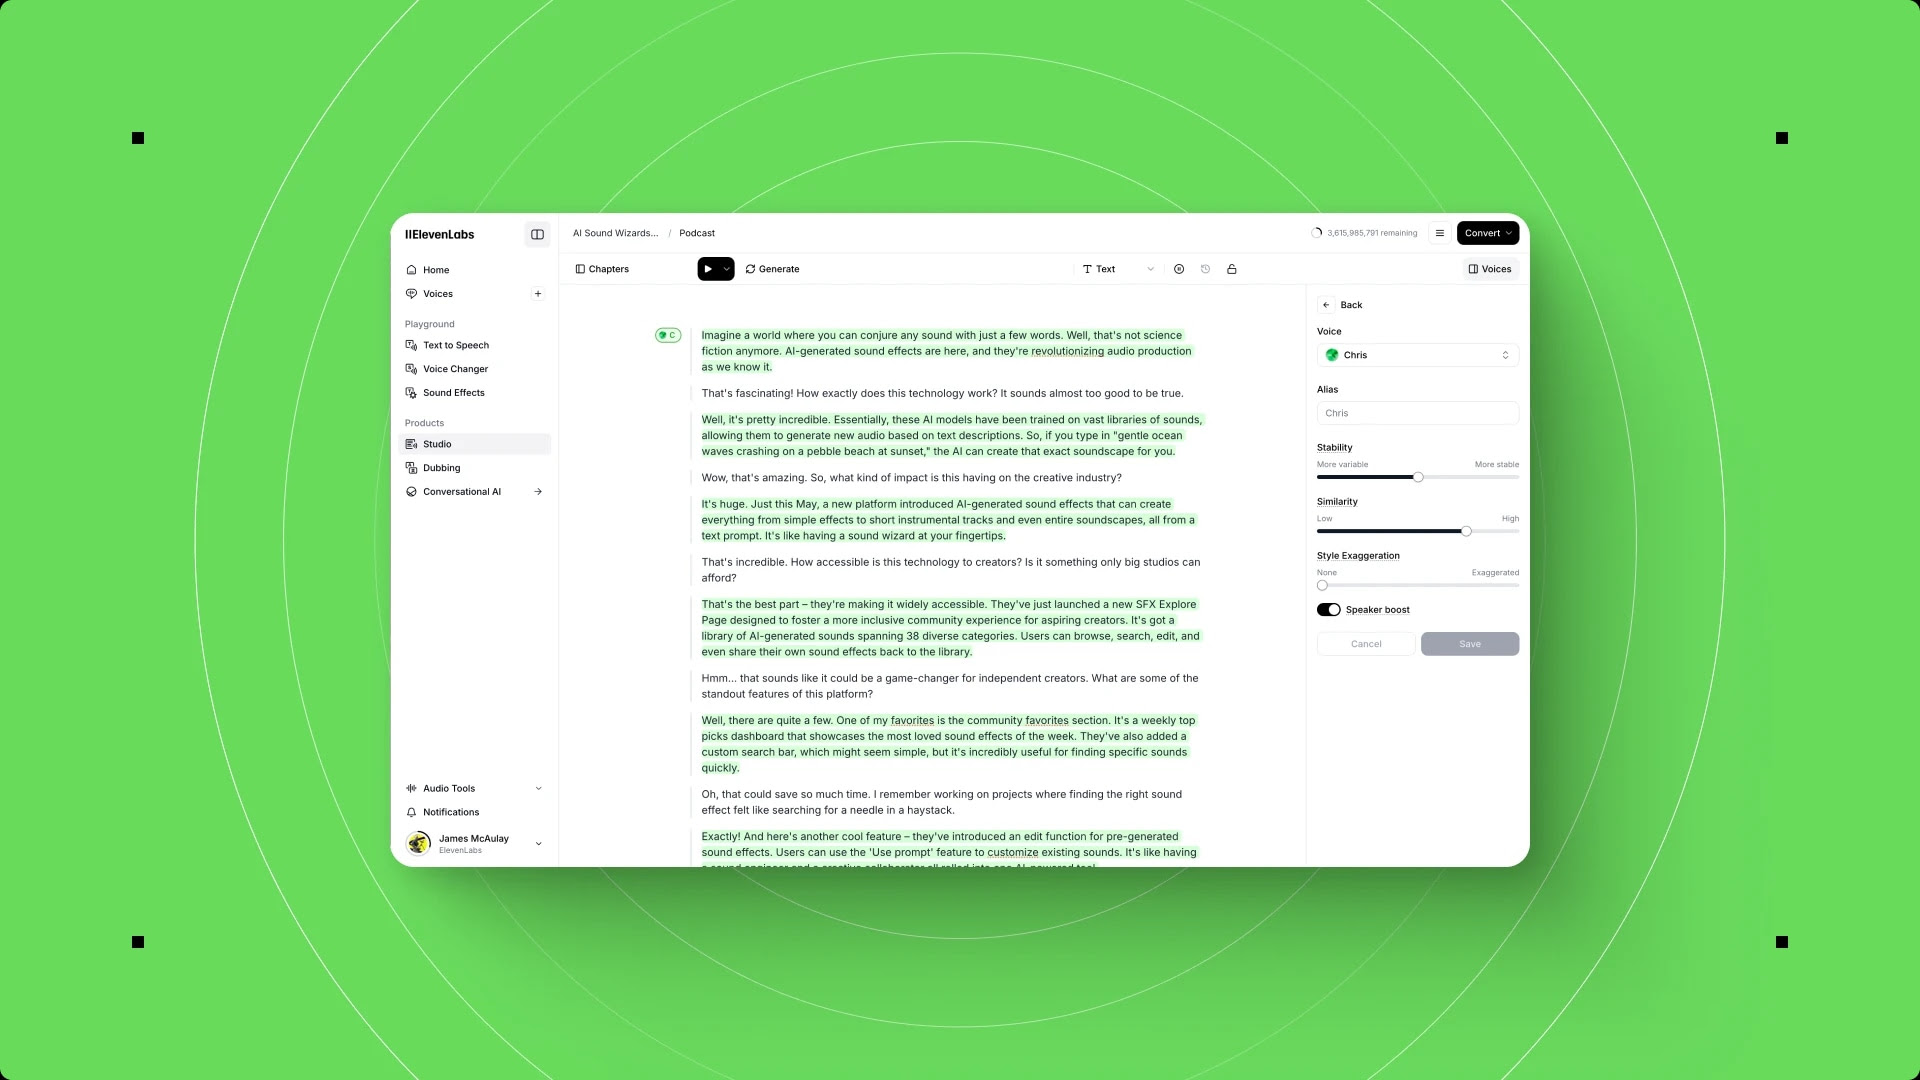
Log in to your ElevenLabs dashboard. Navigate to Audio Native in the left sidebar - the Audio Native getting started docs cover this section in screenshots. If your dashboard version shows a Products menu instead, look for Audio Native under that section.
Click Create New Project or Get Embed Code (the button label varies by dashboard version). You will see a configuration panel with these fields:
- Project Name - Give it a descriptive name like “My WordPress Blog” so you can identify it in analytics later
- Voice - Select the voice you chose during prerequisites
- Player Style - Choose between Small (compact bar) or Large (prominent player with progress bar)
- Player Color - Enter a hex color that matches your WordPress theme accent color
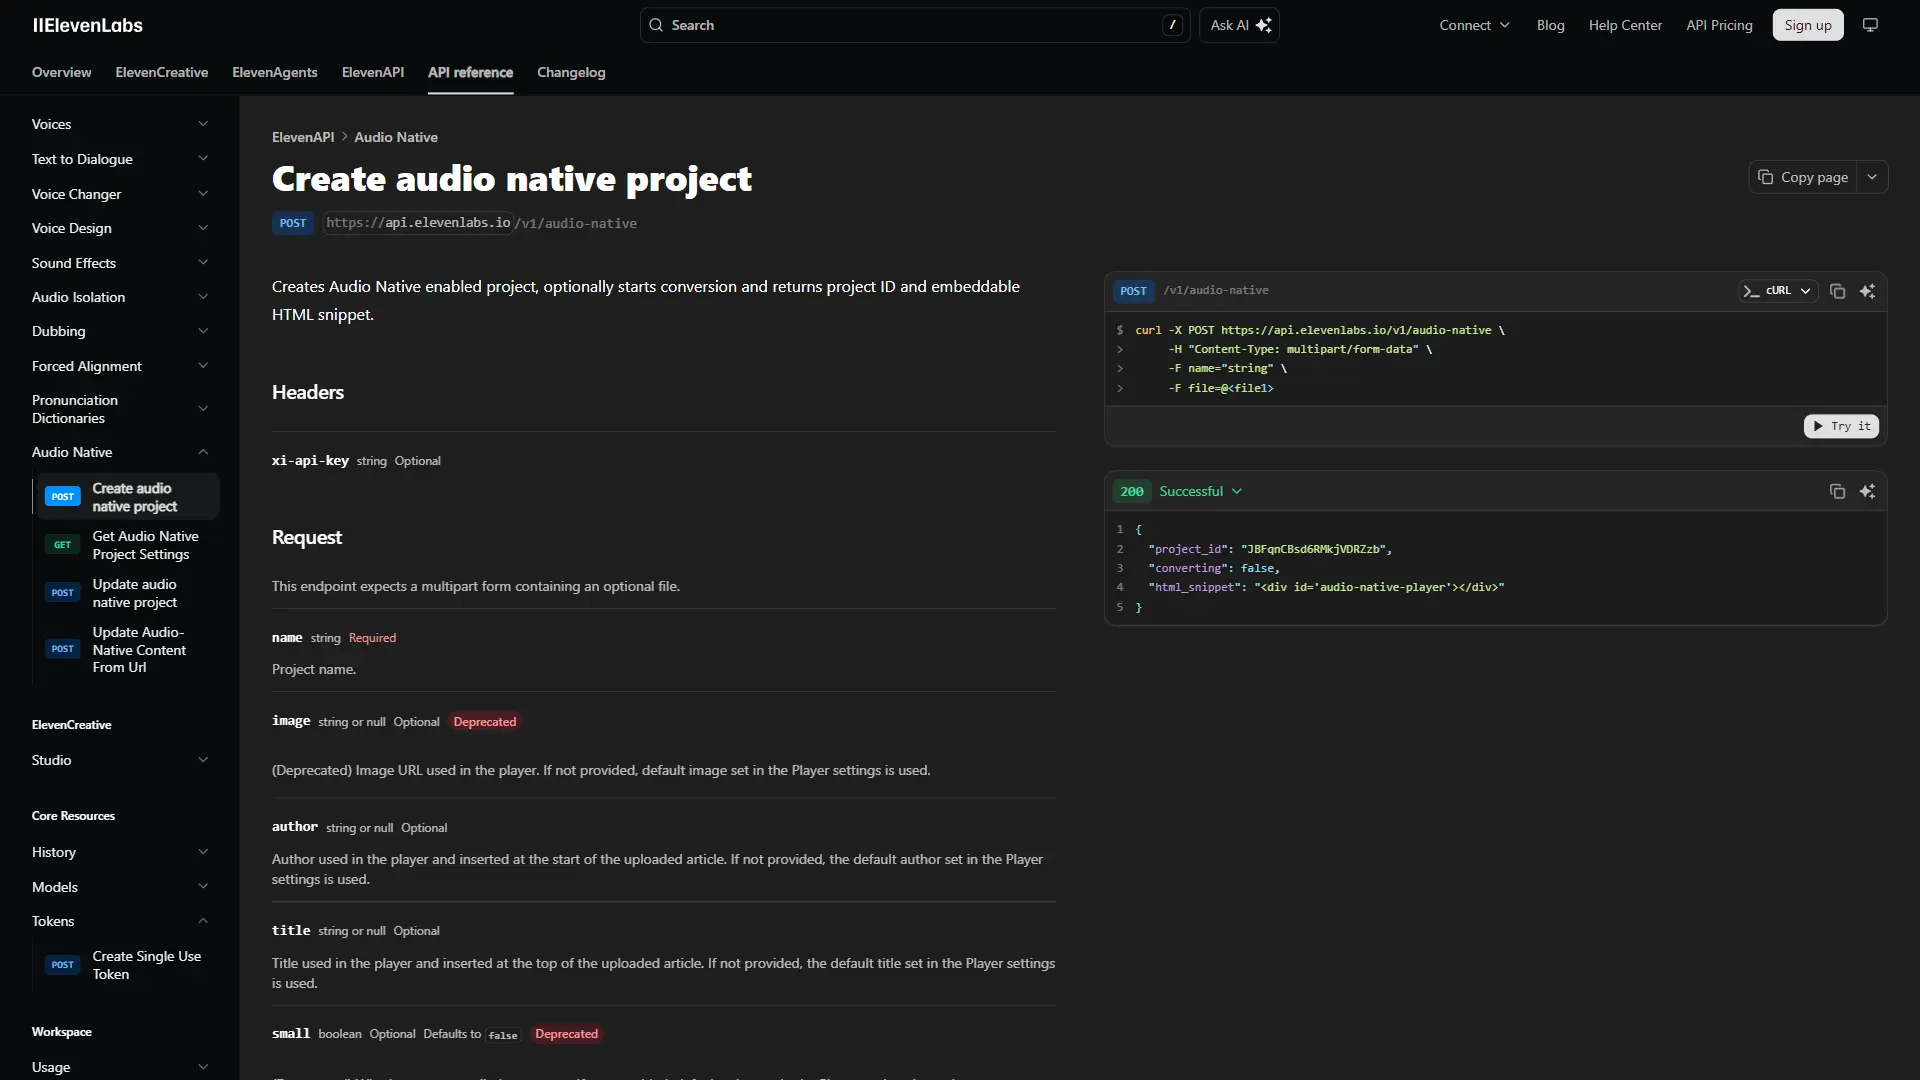
After configuring these options, ElevenLabs generates a JavaScript snippet. It looks similar to this:
<script
  src="https://elevenlabs.io/player/audioNativeHelper.js"
  type="text/javascript"
  data-project-id="YOUR_PROJECT_ID"
  data-player-style="small"
  data-player-color="#2563eb"
></script>
Copy this snippet to your clipboard. The data-project-id value is unique to your account and connects the player to your configuration.
Step 2: Add the ElevenLabs WordPress audio embed via Plugin Method (Recommended)
The plugin method is safer than editing theme files because it survives theme updates and does not risk breaking your site if you paste the ElevenLabs WordPress audio embed code in the wrong location. The free WPCode plugin on the WordPress.org repository is the simplest path.
Install WPCode:
- In your WordPress admin, go to Plugins > Add New
- Search for “WPCode” (by WPCode)
- Click Install Now, then Activate
Add the embed code:
- Navigate to Code Snippets > Header & Footer in the WordPress admin sidebar
- Paste the Audio Native embed snippet into the Header section
- Click Save Changes
That is it. The script now loads on every page of your WordPress site. Audio Native’s URL allowlist (configured in Step 3) controls which pages actually display the player.
Alternative: Manual theme file injection. If you prefer not to install a plugin, go to Appearance > Theme File Editor, open your header.php file, and paste the embed snippet just before the closing </head> tag. Warning: this change is overwritten if you update your theme. If you use a child theme, edit the child theme’s header.php instead.
Step 3: Add to WordPress - Per-Post Method
If you want audio on only specific posts rather than site-wide, skip the header injection and add the embed directly to individual posts.
- Open any post in the WordPress Block Editor (Gutenberg)
- Click the + button to add a new block
- Search for Custom HTML and add that block
- Paste the Audio Native embed snippet into the HTML block
- Position the block where you want the player to appear - typically just below the post title or featured image
- Update or Publish the post
This approach gives you granular control at the cost of manual effort for each post. For most WordPress sites publishing regularly, the site-wide method with allowlist filtering is more practical.
Step 4: Configure the URL Allowlist
Back in the ElevenLabs Audio Native settings, navigate to the Allowlist section. This controls which pages on your domain display the audio player.
For a typical WordPress blog, add these patterns:
https://yourdomain.com/blog/*- if your posts live under a /blog/ pathhttps://yourdomain.com/????/??/??/*- if you use date-based permalink structurehttps://yourdomain.com/*- if you want every page covered (then exclude non-content pages)
For WordPress sites using the default permalink structure (Post name), adding https://yourdomain.com/* and relying on Audio Native’s content detection to skip pages with minimal text often works well. Pages with very little text content - like your Contact or About page - generally do not trigger the player because there is not enough text to narrate.
Test by visiting a published post. You should see the audio player appear. If it does not show, clear your WordPress cache and try again.
Step 5: Clear Your WordPress Cache
This step catches most “I added the ElevenLabs WordPress audio embed but the player does not appear” issues. If you use a caching plugin:
| Field | Value |
|---|---|
| WP Rocket | Go to WP Rocket settings and click Clear Cache |
| W3 Total Cache | Click Performance > Dashboard > Empty All Caches |
| WP Super Cache | Go to Settings > WP Super Cache > Delete Cache |
| LiteSpeed Cache | Click LiteSpeed Cache > Toolbox > Purge All |
| Cloudflare | If you use Cloudflare as a CDN, purge the cache from your Cloudflare dashboard as well |
After clearing the cache, visit a post in an incognito browser window to confirm the player loads correctly.
Customizing the Audio Player
Audio Native provides several customization options so the player looks native to your WordPress theme rather than like a third-party widget.
Player Style
Two styles are available:
- Small - A slim horizontal bar with play/pause, a progress indicator, and a speed control. Takes up minimal vertical space. Works well when audio is a secondary option alongside the written content.
- Large - A taller player with more visible controls, waveform visualization, and download option. Better for sites where the audio experience is a primary feature.
Set the style through the data-player-style attribute in your embed snippet or from the Audio Native dashboard.
Matching Your Theme Colors
The data-player-color attribute accepts any hex color value. To match your WordPress theme:
- Open your site in a browser and right-click any accent-colored element (like a link or button)
- Select Inspect to open developer tools
- Find the element’s color property - this is your theme accent hex code
- Set that value as your
data-player-color
Common examples:
data-player-color="#2563eb"   /* Tailwind blue - popular with developer blogs */
data-player-color="#10b981"   /* Green accent - suits health and lifestyle sites */
data-player-color="#8b5cf6"   /* Purple - works well on creative and design blogs */
data-player-color="#1a1a1a"   /* Near-black - clean look for minimalist themes */
If your WordPress theme supports dark mode, test the player color against both light and dark backgrounds. A mid-tone accent color typically works for both.
Player Position
For the site-wide header injection method, the player typically renders at the top of the post content area. Most WordPress themes place the <article> tag right after the post title and featured image, so the player appears in a natural location.
If you want the player in a different position:
- Using a page builder (Elementor, Divi, Beaver Builder): Add an HTML widget to your single post template at the exact position you want the player. Paste the embed snippet inside the widget.
- Using a theme hook plugin: Plugins like “Code Snippets” let you hook PHP code to specific WordPress template actions like
genesis_before_entry_content(Genesis themes) ortheme_before_content(varies by theme). - Using CSS: Add custom CSS to reposition the player container. The Audio Native player renders inside a
divthat you can target with CSS rules for margin, padding, and positioning.
The most effective position for engagement is directly below the post title and above the first paragraph. Readers see the player immediately and know the audio option exists without scrolling.
Voice Selection for Blog Content
The voice you assign to Audio Native becomes your blog’s audio identity. Every post uses the same voice, creating a consistent listening experience that builds recognition over time - similar to how a podcast host’s voice becomes associated with the show.
Choosing the right voice for your WordPress blog:
- Match formality to your content. A professional, measured voice suits business blogs and documentation. A warmer, conversational voice fits lifestyle, personal development, and creative content.
- Consider your typical sentence structure. If your writing uses long, complex sentences, choose a voice with strong pacing control - some voices handle lengthy sentences more naturally than others. Test with actual paragraphs from your published posts, not sample text.
- Think about audience expectations. A tech blog’s audience may expect a clear, direct voice. A cooking blog’s audience may prefer something warmer and more inviting. There is no universal best choice.
Testing before committing:
- Go to the ElevenLabs Text to Speech workspace
- Copy two or three paragraphs from one of your existing WordPress posts
- Generate audio with your top three voice candidates
- Listen to each version and pick the one that feels most natural for your content style
You can change the voice later in your Audio Native settings, but keep in mind that switching regenerates audio for all existing posts and consumes your character quota. Getting the voice right during initial setup saves both characters and the jarring experience of your audience hearing a different voice one day.
For a deeper dive into voice options, see the ElevenLabs Voice Library guide.
Automatic vs Manual Article Narration
Audio Native offers two deployment models, and your choice depends on how much control you want versus how much maintenance you are willing to accept.
Automatic Narration (Site-Wide)
When you add the embed code to your WordPress header and configure a broad URL allowlist, every post that matches the allowlist pattern gets an audio player automatically. Publish a new post and the audio version appears without any additional action.
Pros:
- Zero per-post effort after initial setup
- New content gets audio immediately on publish
- Consistent coverage across your entire archive
Cons:
- Some posts may not suit audio (heavy code content, short posts, visual-heavy listicles)
- Every auto-generated article consumes your character quota
- Less control over which content gets prioritized for voicing
Manual Narration (Selective)
Using the per-post Custom HTML block method, you add the embed only to posts where audio adds genuine value. This gives you complete control over your audio library.
Pros:
- Full control over character quota usage
- Only your best content gets the audio treatment
- No wasted generations on posts that do not suit audio format
Cons:
- Requires a manual step every time you want audio on a post
- Easy to forget, leading to inconsistent coverage
- Does not retroactively cover your archive without individual editing
Recommended Approach
Start with site-wide automatic deployment for one month. Use the ElevenLabs analytics to identify which posts get the most plays and which get ignored. After that initial period, you have data to decide: if most posts get healthy play counts, keep the automatic setup. If only certain content types perform well, switch to selective deployment and add the embed only to posts matching those content types.
Handling Special Content
WordPress posts often contain more than plain paragraphs. Understanding how Audio Native handles special content types prevents surprises.
Code Blocks
Audio Native reads the text inside <code> and <pre> elements. For technical blogs, this means the player will attempt to narrate code snippets line by line - which sounds awkward and confusing. If you maintain technical content elsewhere too, the ElevenLabs API developer setup guide shows how to programmatically skip non-prose content. If your posts regularly include code blocks, consider these approaches:
- Use the CSS selector configuration in Audio Native settings to target only the prose content of your posts, excluding code blocks. This requires your theme to wrap code in identifiable containers.
- Wrap code blocks in a container with a specific class and configure Audio Native to skip that class. Some WordPress code syntax plugins (like Prismatic or SyntaxHighlighter) already add unique wrapper classes.
Tables and Data
HTML tables are read as a flat sequence of cell values, which rarely makes sense as audio. If your posts contain comparison tables or data grids, listeners will hear a disjointed stream of numbers and labels. There is no perfect solution here - the best practice is to include a narrative summary before or after tables so the audio version captures the key takeaway even if the table itself sounds garbled. The W3C accessible tables guidance is a good companion read.
Images and Captions
Audio Native skips <img> elements entirely. Image captions inside <figcaption> tags may or may not be read depending on your theme’s HTML structure. Alt text is not narrated. For posts that rely heavily on annotated screenshots or infographics, the audio version will have gaps where visual content was supposed to carry the explanation. Add descriptive text paragraphs alongside image-heavy sections to maintain audio continuity.
Blockquotes
Blockquotes are read as regular text without any vocal distinction. The listener will not know that a passage was quoted unless your writing includes explicit attribution like “As John Smith wrote…” before the quote.
Shortcodes and Dynamic Content
WordPress shortcodes that render text content are generally handled well because Audio Native reads the rendered HTML output, not the raw shortcode syntax. Dynamic content that loads via JavaScript after the initial page render may not be detected, depending on timing. Test any shortcode-heavy posts individually.
ElevenLabs WordPress Audio Embed Performance and SEO Considerations
Adding any third-party JavaScript to your WordPress site has performance implications. The ElevenLabs WordPress audio embed is lightweight, but here is what to expect and how to optimize. Refer to Google’s Core Web Vitals documentation for the metrics that matter most.
Page Speed Impact
The Audio Native embed script adds approximately 30 to 50 KB of JavaScript to each page load. For most WordPress sites, this has a negligible impact on Core Web Vitals - run a PageSpeed Insights check before and after to confirm. However, if your site already loads heavy page builder assets, multiple tracking scripts, and large images, the cumulative effect can push your Largest Contentful Paint (LCP) into slower territory.
Optimization tips:
- Load the Audio Native script with
deferorasyncattributes if your injection method supports it. WPCode allows you to add attributes to script tags. - If you use a performance plugin like Perfmatters or Asset CleanUp, ensure it does not accidentally defer or delay the Audio Native script to the point where the player appears too late.
- Monitor your Core Web Vitals in Google Search Console for two weeks after deployment. If scores drop, investigate whether the Audio Native script is the cause or if the timing coincided with other site changes.
SEO Benefits
Audio content on blog posts creates indirect SEO signals:
- Increased time on page. Visitors who press play and listen typically stay on the page longer than readers who skim. Search engines may interpret this as positive engagement.
- Lower bounce rate. An audio option gives visitors a reason to stay even if they initially planned to leave.
- Accessibility improvement. Audio versions serve visitors with reading difficulties or visual impairments, broadening your content’s reach.
- Structured data opportunity. You can add AudioObject schema markup from Schema.org to posts with audio players. This tells search engines that the page offers audio content and may qualify for rich results in Google Search.
Accessibility
The Audio Native player includes keyboard navigation and screen reader labels. Adding audio to your WordPress posts improves accessibility for visitors who cannot or prefer not to read on screen. This aligns with the Web Content Accessibility Guidelines (WCAG) recommendations for providing multiple ways to consume content.
Testing Your Setup
After completing the setup, run through this checklist to confirm everything works correctly.
Desktop testing:
- Open a published post in Chrome, Firefox, and Safari (if available)
- Confirm the audio player appears in the expected position
- Press play and listen to at least 30 seconds to verify voice quality and content accuracy
- Test the speed control (1x, 1.5x, 2x) to confirm it works
- Check that the player color matches your theme
Mobile testing:
- Open the same post on your phone’s browser
- Verify the player renders correctly and does not overlap with mobile navigation or sticky headers
- Press play and confirm audio plays through your phone’s speakers or headphones
- Test with your phone locked - audio should continue playing in the background on most devices
Cache and CDN testing:
- Open the post in an incognito or private browser window to bypass local cache
- If you use a CDN like Cloudflare, verify the page loads the Audio Native script by checking the browser’s Network tab in developer tools
- Ask a colleague or friend to visit the page from their device and confirm the player appears
Content accuracy testing:
- Listen to the full audio on at least two or three posts
- Compare the narrated content against the written text - confirm the player reads the article body and not sidebar content, navigation text, or footer copy
- If the player reads unwanted content, return to the Audio Native dashboard and configure a CSS selector to target only your post content container (commonly
.entry-content,.post-content, orarticle .content)
Pro Tips for Audio Blog Success
Mention the audio option in your posts. Add a short line near the top of your posts like “Prefer to listen? Press play above.” Many visitors will not notice the player unless you call attention to it. A single sentence can double your play rate, and the Nielsen Norman Group’s research on call-to-action visibility backs this up.
Promote audio in your newsletter. If you send email newsletters, mention that posts now have an audio option. Newsletter subscribers are already engaged with your content and are the most likely audience to try the audio player.
Batch your edits. Every time you update a post’s text, Audio Native regenerates the audio and consumes characters from your quota. If you are doing a content audit and updating multiple posts, batch the changes and publish them together rather than editing one post at a time throughout the week.
Monitor your character usage. The Creator plan includes 100,000 characters per month. A typical 1,500-word blog post uses roughly 8,000 to 10,000 characters. That means you can voice approximately 10 to 12 posts per month before hitting the limit. If you publish more frequently, track your usage in the ElevenLabs dashboard and consider the Pro plan ($99/month with 500,000 characters) - the ElevenLabs voice library guide can help you pick a voice that holds up across long monthly volumes.
Create an audio content calendar. If you use the selective deployment method, decide at the content planning stage which posts will get audio. Posts with narrative structure, opinion pieces, and how-to guides tend to perform best as audio. Data-heavy posts and code tutorials tend to perform worst.
Use Audio Native analytics to inform content strategy. After a month of deployment, the per-post play data tells you which topics your audience prefers to listen to. Double down on those content types for future posts.
Frequently Asked Questions
Do I need a special WordPress plugin for ElevenLabs?
No. ElevenLabs does not have a dedicated WordPress plugin. The integration uses a standard JavaScript embed snippet that you add through a general-purpose code injection plugin like WPCode, or by editing your theme files directly. No ElevenLabs-specific plugin is required.
Does Audio Native work with WordPress multisite installations?
Yes. Add the embed code to each site in your multisite network individually, either through a network-activated code injection plugin or through each site’s theme settings. Each site can use the same Audio Native project ID (sharing one voice and configuration) or different project IDs if you want different voices for different sites.
Will Audio Native slow down my WordPress site?
The impact is minimal. The embed script is approximately 30 to 50 KB and loads asynchronously by default. On most WordPress hosting setups, the added load time is under 100 milliseconds. If your site is already performance-optimized and scores well on Core Web Vitals, the Audio Native script should not cause a noticeable regression. Monitor your PageSpeed Insights scores for two weeks after deployment to confirm.
What happens if I switch WordPress themes?
If you added the embed code through a plugin like WPCode, the code persists across theme changes - no action needed. If you added it directly to your theme’s header.php file, you will need to re-add it to the new theme’s header file after switching. This is the primary reason the plugin method is recommended.
Can I use Audio Native with Elementor, Divi, or other page builders?
Yes. For site-wide deployment via header injection, the page builder does not affect anything because the script loads in the <head> section before the builder renders content. For per-post deployment, use the page builder’s HTML or Code widget to place the embed snippet at the desired position within your post layout. In Elementor, this is the HTML widget. In Divi, use the Code Module. In Beaver Builder, use the HTML Module.
How do I disable audio on a specific post?
If you are using site-wide deployment with an allowlist, remove that specific post’s URL from the allowlist pattern. Alternatively, if your allowlist uses a wildcard, you can add an exclusion rule in some configurations. For the simplest approach, switch to per-post deployment for fine-grained control, or contact ElevenLabs support about exclusion patterns for your allowlist setup.
Want to learn more about ElevenLabs?
Related Guides
- ElevenLabs Audio Native: Embed Audio on Any Website - General Audio Native guide for Webflow, Wix, and Framer
- Getting Started with ElevenLabs - Account setup and first generation
- ElevenLabs Voice Library Guide - Pick the right voice for your blog before deploying
- ElevenLabs Pronunciation Dictionary Setup - Fix mispronounced brand names in narrated posts
- ElevenLabs API Developer Setup - Programmatic access for advanced WordPress integrations
Related Reading
- ElevenLabs - Full review with pricing, ratings, and feature breakdown
- Best AI Voice Generators 2026 - How ElevenLabs compares to Murf, LOVO, WellSaid Labs, and others
- ElevenLabs Alternatives - Top alternatives if you want to compare options before committing
External Resources
- ElevenLabs Audio Native Documentation - Official setup instructions and embed code reference
- WPCode Plugin (WordPress.org) - The recommended header/footer injection plugin for WordPress
- Google Core Web Vitals Reference - Performance metrics to monitor after deploying the embed
Related Guides
- AI Video Creation Tips: 2026 Walkthrough for Teams
- AI Voice Cloning Ethics Best Practices: Complete 2026 Guide
- AI Voiceover Corporate Training With WellSaid Labs
- AI Voiceover Tips: Making Synthetic Voices Sound Human
- ElevenLabs API Setup: Developer Quick Start Guide (2026)
- ElevenLabs Audio Native Embed Audio on Any Website
- ElevenLabs Audio Quality Settings: Pro Tips and Settings
- ElevenLabs Audiobook Creation: Long-Form Audiobook
- ElevenLabs Conversational AI Agents: Build Voice Agents
- ElevenLabs Dubbing Studio: Video Translation and Dubbing