ElevenLabs Audio Native embed is a player snippet that turns written articles into listenable audio using ElevenLabs voices. This guide covers generating the embed code, adding it to a page, configuring voice and playback behavior, and keeping the narration in sync when article text changes so readers can press play instead of reading.
If you publish written content online and want to offer an audio version without recording anything yourself, the ElevenLabs Audio Native embed is the fastest path from article to listenable audio. You paste a small code snippet into your website, and the ElevenLabs embed automatically converts the text on that page into a voiced player that visitors can press play on. No manual generation. No file uploads. No audio editing. The player reads the page content in real-time using ElevenLabs voices and serves it through a lightweight embedded widget.
This guide covers the complete setup process for Audio Native - from generating your embed code to deploying it across WordPress, Webflow, Wix, and Framer. The snippet is served by ElevenLabs rather than a static file you save, so there is no separate ElevenLabs Audio Native embed download step to manage. You will learn how to customize the player appearance, configure URL allowlists so the embed only works on your domains, interpret the listener analytics dashboard, and develop a content strategy that maximizes the return on voiced articles. Audio Native is available on the Creator plan (See pricing page) and above.
If you are new to ElevenLabs and have not created an account yet, start with the Getting Started with ElevenLabs guide first, then come back here once your account is active.
What the ElevenLabs Audio Native Embed Does
Audio Native is an automatic text-to-speech embed that converts the written content on any webpage into a playable audio version. It differs from manually generating audio in the ElevenLabs Voiceover Studio because there is no generation step on your end. The embed code reads the page content when a visitor loads the page (or when you first configure it), converts it to speech, and presents an audio player.
The core workflow is simple:
- You generate an embed code snippet from your ElevenLabs dashboard
- You paste that snippet into your website header, footer, or individual pages
- Audio Native detects the text content on each page and creates a voiced version (similar to the Studio voiceover workflow)
- Visitors see a player widget and can listen to the article instead of reading it
What makes this different from recording voiceovers:
- Zero production effort. You do not record, edit, or upload anything. New articles get an audio version automatically when you publish them.
- Voice consistency. Every article uses the same voice, giving your site a consistent audio brand. You choose the voice once during setup.
- Automatic updates. If you edit an article, Audio Native regenerates the audio to match the updated content. No re-recording needed.
- Analytics built in. The ElevenLabs dashboard tracks plays, listen duration, and listener behavior across your entire site.
Audio Native works best for blogs, news sites, documentation, and knowledge bases. It is less suited for pages with minimal text or content that relies on visual context like charts and code blocks. For a full comparison of AI voice tools suitable for web audio, see the best AI voice generators 2026 roundup.
When to Use Audio Native
Not every page on your site benefits from an audio player. Before deploying Audio Native site-wide, think about where audio adds genuine value versus where it creates noise.
Strong candidates for Audio Native:
- Long-form blog posts and articles (1,000+ words) where readers may prefer listening - see voice cloning ethics for considerations when narrating user content
- How-to guides and tutorials that readers follow step by step
- News updates and industry analysis that professionals consume during commutes
- Product documentation and help articles that support teams reference frequently
- Newsletter archives republished on your website
For pre-recorded long-form material like audiobooks or podcast episodes, the ElevenLabs Projects audiobook workflow is a better fit than Audio Native.
Poor candidates:
- Landing pages with short copy where there is not enough text to justify a player
- Pages with heavy code snippets, tables, or data visualizations that do not translate to audio
- E-commerce product pages where the buying flow matters more than content consumption
A practical starting point is to enable Audio Native on your top 20 articles by traffic and measure engagement before expanding to the full site.
How Do You Set Up the Audio Native Embed?
Setting up Audio Native takes about 10 minutes. You need an active ElevenLabs account on the Creator plan or above.
Step 1: Access Audio Native Settings
Log in to your ElevenLabs dashboard and navigate to the Audio Native section. Depending on your dashboard version, this may appear in the left sidebar under Products or in the main navigation. If you do not see it, confirm that your plan is Creator tier or above. Review the current ElevenLabs plan details if you need to upgrade; Free and Starter accounts do not include Audio Native.
Step 2: Choose Your Voice
Select the voice that will narrate your content. The ElevenLabs voice library guide walks through how to filter and audition voices. This voice applies to all pages where the embed is deployed, so choose carefully. Consider these factors:
- Accent and language. Match your audience. If your site is in English and targets a US audience, select a voice with an American accent. For multilingual sites, Audio Native supports ElevenLabs’ full language library.
- Tone and pacing. A calm, measured voice works well for educational and professional content. A more energetic voice suits lifestyle and entertainment blogs. Listen to several options with sample text from your actual articles before committing.
- Gender and age. There is no universal best choice. Pick what feels natural for your brand and content type.
You can change the voice later, but doing so regenerates all existing audio, which uses your character quota. Get it right the first time if possible.
Step 3: Configure Content Detection
Audio Native needs to know which parts of your page contain the article text. By default, it attempts to detect the main content area automatically using semantic HTML cues like <article>, <main>, and heading structure. For most standard blog layouts, automatic detection works well.
If your site has an unusual layout or the player is reading sidebar content, navigation text, or footer copy, you can specify a CSS selector that targets only the article body. For example:
.post-contentfor a WordPress theme that wraps article text in that classarticle.blog-postfor a semantic HTML blog layout#main-contentfor sites that use an ID-based content wrapper
Test the detection on a few pages before deploying site-wide to make sure the player reads the right content.
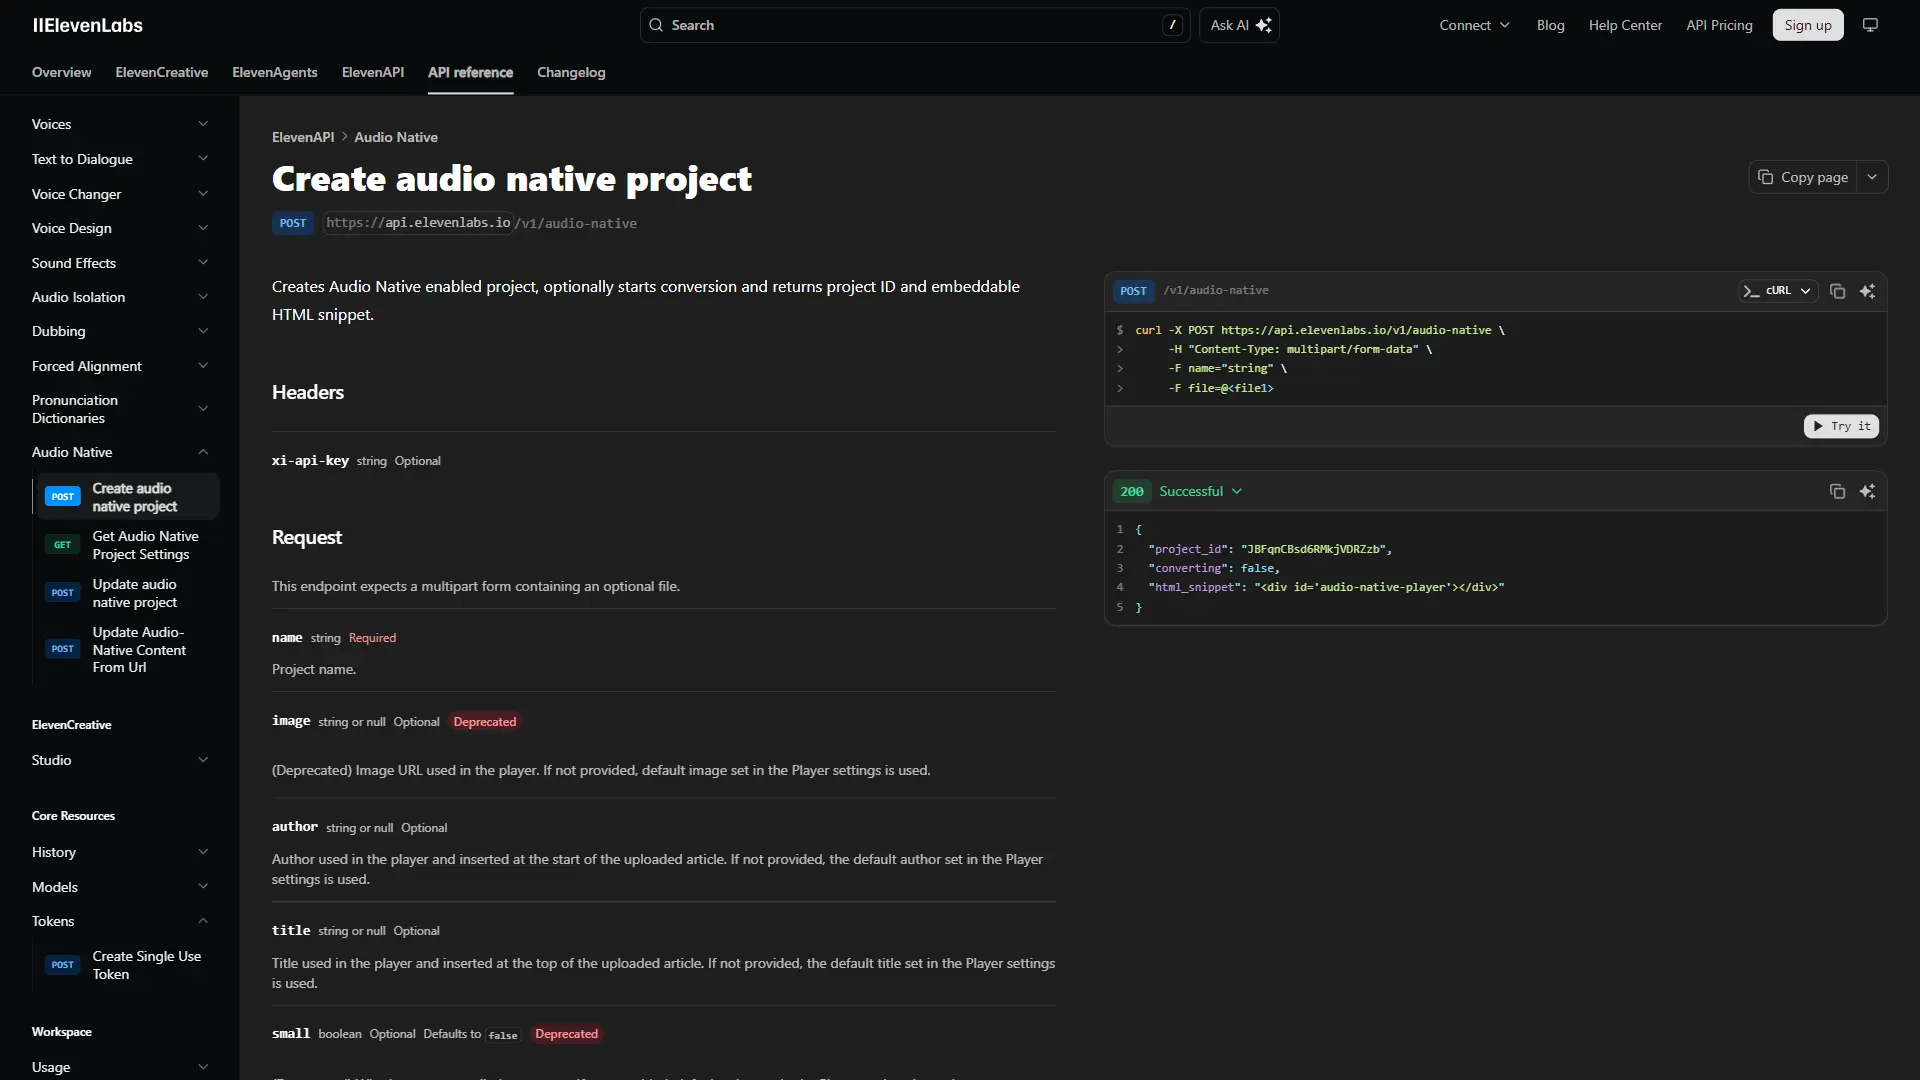
Step 4: Generate Your Embed Code
Click the button to generate your embed snippet. ElevenLabs provides a JavaScript code block that looks similar to this structure:
<script
  src="https://elevenlabs.io/player/audioNativeHelper.js"
  type="text/javascript"
  data-project-id="YOUR_PROJECT_ID"
  data-player-style="small"
  data-player-color="#2563eb"
></script>
Copy this snippet. You will paste it into your website in the next step. The data-project-id value is unique to your account and connects the player to your Audio Native configuration, voice selection, and analytics.
Embed Code Deployment
Where you place the embed code determines which pages get the audio player. You have two deployment strategies:
Site-wide deployment. Paste the snippet into your site header or a global template file. Every page loads the player. Audio Native’s allowlist (covered later) controls which pages actually display it.
Per-page deployment. Add the snippet only to specific page templates or individual posts. This gives you more granular control but requires more maintenance as you publish new content.
For most sites, site-wide deployment with an allowlist is the cleaner approach.
Platform Guides
WordPress
WordPress is the most common platform for Audio Native deployments. You have several options depending on your setup.
Option 1: Theme header (recommended for site-wide). Go to Appearance > Theme File Editor and open your header.php file. Paste the embed snippet just before the closing </head> tag. This loads Audio Native on every page, and you control visibility through the allowlist. See WordPress Theme File Editor docs for safe editing practices.
Option 2: Plugin-based injection. If you prefer not to edit theme files, use a header/footer injection plugin like Insert Headers and Footers (by WPCode) or Header Footer Code Manager. Install the plugin, paste the Audio Native snippet into the header section, and save. This survives theme updates.
Option 3: Per-post with Custom HTML block. In the WordPress block editor, add a Custom HTML block to any post where you want the player. Paste the embed snippet. This approach works for testing on a handful of posts before committing to site-wide deployment. The WordPress audio setup guide covers plugin-free deployment in detail.
WordPress-specific tips:
- If you use a caching plugin (WP Super Cache, W3 Total Cache, WP Rocket), clear your cache after adding the embed code so the script loads on the next page visit.
- For sites using a page builder like Elementor or Divi, look for an HTML/code widget to place the snippet within your post template.
- Audio Native respects the
<article>tag that most WordPress themes wrap post content in. If your theme uses a non-standard structure, set the CSS selector in the Audio Native dashboard.
Webflow
Webflow makes embed deployment straightforward through its built-in custom code features.
Site-wide: Go to Project Settings > Custom Code and paste the Audio Native snippet in the Head Code section. Publish your site for the change to take effect.
Per-page: Open the page in the Webflow Designer, add an Embed element where you want the player to appear, and paste the snippet. This is useful if you want the player to render in a specific position within the layout rather than floating.
CMS Collection pages: If your blog posts are Webflow CMS Collection items, add the embed code to the Collection Page template. This deploys the player across all blog posts automatically. The CSS selector configuration in your Audio Native dashboard should target the rich text block class that Webflow assigns to your CMS content field.
Wix
Go to Settings > Advanced > Custom Code, click Add Custom Code, paste the Audio Native snippet, set it to load in the Head section, and apply it to All Pages. Save and publish. For per-page deployment, add an HTML iframe element in the Wix Editor and paste the embed code inside it.
Wix uses a heavily customized DOM structure, so you may need to experiment with the CSS selector in Audio Native settings to target the correct content container. If you use Wix Blog, test that Audio Native correctly detects article text after the page fully loads.
Framer
Open Site Settings > General > Custom Code and paste the snippet in the Head section for site-wide deployment. For per-page control, use a Code component on the Framer canvas and paste the Audio Native embed script inside it. Framer’s component-based architecture means content structure can vary between pages, so use the CSS selector override to target the specific content wrapper class if automatic detection misses your text blocks.
Customization
Audio Native offers several visual customization options so the player fits your site design rather than looking like a foreign widget.

Player Style
ElevenLabs provides multiple player style presets:
- Small - A compact bar player that sits at the top or bottom of the article. Minimal visual footprint. Best for sites where the audio option should be available but not visually dominant.
- Large - A more prominent player with album-art-style layout, progress bar, and visible controls. Better for sites where audio is a primary content experience rather than an add-on.
You set the style through the data-player-style attribute in the embed code or through the Audio Native dashboard settings.
Player Color
The data-player-color attribute accepts any hex color value. Match it to your brand’s primary color for a cohesive look:
data-player-color="#2563eb"   (blue)
data-player-color="#16a34a"   (green)
data-player-color="#dc2626"   (red)
data-player-color="#000000"   (black)
If your site uses a dark theme, choose a lighter accent color for the player controls so they remain visible. Test the player against your actual page background - what looks good in isolation can clash in context.
Player Positioning
By default, Audio Native renders the player at the position where the embed code appears in the DOM. For site-wide header injection, the player typically anchors to the top of the content area. If you want the player in a specific location, place the embed snippet at that exact position in your HTML template or use CSS to reposition the container. The ideal placement is directly above or below the article title, before the main content begins.
URL Allowlist Configuration
The URL allowlist is a critical security and cost-management feature. It controls which pages on your domain can use your Audio Native embed. Without an allowlist, anyone who copies your embed snippet could theoretically use your ElevenLabs quota on their site.
Setting Up the Allowlist
In the Audio Native settings, navigate to the Allowlist section. The official Audio Native customization docs describe each option. You can add URLs in several formats:
- Exact URLs -
https://yoursite.com/blog/specific-post- Only this exact page gets the player - Wildcard paths -
https://yoursite.com/blog/*- All pages under /blog/ get the player - Full domain -
https://yoursite.com/*- Every page on the domain is allowed
Recommended Configuration
For most content sites, a path-based wildcard is the right approach:
- Allow
https://yoursite.com/blog/*to cover all blog posts - Allow
https://yoursite.com/guides/*if you have a separate guides section - Leave out paths like
/about,/contact,/pricingwhere audio adds no value
This keeps your character usage focused on content pages where listeners actually benefit, and it prevents the embed from generating audio for short utility pages.
Testing the Allowlist
After configuring the allowlist, test by visiting both allowed and blocked pages to confirm the player appears only where expected. If it shows on a page you intended to block, double-check your allowlist patterns for trailing slashes or path mismatches.
Listener Analytics
One of Audio Native’s most valuable features is its analytics dashboard, which tracks how visitors interact with the audio player across your site. This data helps you understand which content works best in audio format and where to focus your voicing efforts.
Key Metrics
Total plays. The number of times visitors press play across all pages. This is your top-level engagement indicator. A steady increase in total plays after deployment confirms that your audience values the audio option. Cross-reference this with your Google Analytics engagement reports to see how audio listeners differ from text-only readers.
Listen duration. How long visitors listen on average before stopping or leaving the page. This metric reveals whether people are using the player for the full article or dropping off early. If average listen duration is consistently below 30% of article length, investigate whether the voice selection, pacing, or content type is the issue.
Per-page performance. Breakdown of plays and listen duration by individual URL. This is the most actionable metric. It tells you exactly which articles your audience prefers to listen to rather than read. Use this data to prioritize similar content topics for future voicing.
Interpreting the Data
After running Audio Native for two to four weeks, look for these patterns:
- High plays, high duration - Your best content for audio. Create more like this.
- High plays, low duration - Readers try the audio but the content does not hold them. Check if these are short articles or technical pieces that translate poorly to speech.
- Low plays, any duration - The player may be below the fold, or the article type does not suggest audio value to visitors.
Use these insights to refine which pages you enable Audio Native on. There is no point voicing pages that consistently get zero plays.
Content Strategy for Audio Native
Deploying Audio Native is a technical task. Getting value from it is a content strategy task. The difference between sites that see meaningful engagement and sites that see the player ignored comes down to which content gets voiced and how you signal the audio option to readers.
Which Articles to Voice First
Start with your highest-traffic articles. These pages already have an audience, so adding an audio option reaches the most people with the least effort. Pull your top 20 pages by monthly pageviews from your Google Analytics or Plausible dashboard and enable Audio Native on those first.
Next, prioritize by content type. The following formats translate well to audio:
- Narrative guides that walk through a process or explain a concept step by step
- Opinion and analysis pieces where the author voice adds personality
- Roundup and comparison articles that readers might consume during a commute
- Industry news updates that professionals listen to like a briefing
Content types that translate poorly to audio:
- Code-heavy tutorials where readers need to see the code to follow along
- Data tables and comparison charts that lose all meaning without visual context
- Short listicles under 500 words where the audio version feels unnecessarily brief
Signaling the Audio Option
Many sites deploy Audio Native but never tell readers it exists. Consider adding a line at the top of articles (“Prefer to listen? Press play above.”), mentioning the audio option in your newsletter, including an audio badge in article listings, and referencing the listen option in social media posts. The more visibility you give the player, the higher your play rates will be.
Voice Selection for Web Content
The voice you choose for Audio Native becomes your site’s audio identity. Pick one voice and stick with it across your entire deployment - switching voices between articles creates a disjointed experience. Match the voice to your content tone: clear and neutral for documentation, warmer and conversational for lifestyle content, professional and broadcast-style for news. The voice design guide is useful when you want a voice no one else on the web is using.
Test with real content, not just sample text. Paste an actual paragraph from one of your articles into the ElevenLabs text-to-speech tool and listen to how it handles your vocabulary and sentence structure. The audio quality optimization guide covers stability and similarity tweaks that smooth over awkward sentences. Some voices handle long sentences gracefully while others need shorter, punchier text to sound natural.
SEO Impact Considerations
Adding audio to your pages has indirect SEO benefits, though the relationship is nuanced.
Engagement signals. Visitors who use the audio player typically spend more time on the page, and search engines may interpret longer dwell time and lower bounce rates as positive engagement signals.
Accessibility improvement. Audio versions make your site more accessible to visitors with reading difficulties, visual impairments, or preferences for audio learning. This aligns with WCAG 2.1 guidelines for content perceivability and expands your potential audience.
Page speed considerations. The Audio Native embed adds a JavaScript file to your pages. Monitor your Core Web Vitals after deployment to confirm the embed does not push your Largest Contentful Paint or Total Blocking Time into problematic ranges. If it does, consider lazy-loading the player. Pairing audio with strong written content is also important - see the AI content writing workflow guide for tips on producing articles that translate well to audio.
Structured data opportunity. You can add AudioObject schema markup to pages with Audio Native players. This tells search engines that the page offers audio content, which may result in rich snippet features in search results. Google’s Largest Contentful Paint guide covers how to balance script load order with Core Web Vitals.
Frequently Asked Questions
How much does Audio Native cost?
Audio Native is included with the Creator plan at $22/month and all plans above it. There is no separate fee for the embed feature itself. However, audio generation counts against your plan’s character quota. The Creator plan includes 100,000 characters per month, which translates to roughly 100 to 120 minutes of generated audio. If you have a large site with many articles, monitor your character usage and consider higher tiers on the pricing page - the Pro plan at $99/month bundles 500,000 characters.
Can I use Audio Native with a custom domain?
Yes. Audio Native works with any domain you own. You register your domain in the URL allowlist, and the embed code functions on any page under that domain. There are no restrictions on domain type - it works with .com, .io, .org, custom TLDs, and subdomains like blog.yoursite.com.
Does Audio Native work with single-page applications?
Audio Native supports traditional server-rendered pages reliably. For single-page applications built with React, Vue, or similar frameworks, the behavior depends on how your app handles routing and content rendering. If content is rendered client-side after the initial page load, Audio Native may need to re-detect the content after the DOM updates. Test thoroughly in your SPA environment and consult the ElevenLabs documentation for JavaScript API hooks that allow you to trigger content detection manually after route changes.
Can visitors choose a different voice?
No. The voice is set at the publisher level during Audio Native configuration. Visitors hear whichever voice you selected when you set up the embed. This is by design - it maintains a consistent audio brand across your site. If you want to offer multiple voice options, you would need to build a custom integration using the ElevenLabs API rather than using the Audio Native embed.
What happens when I update an article?
When you edit the text content on a page where Audio Native is deployed, the system detects the content change and regenerates the audio to match the updated text. This regeneration counts against your character quota. If you make frequent small edits (fixing typos, updating dates), be aware that each edit may trigger a regeneration. For sites that update content heavily, consider batching edits and publishing them together rather than making incremental changes throughout the day.
Want to learn more about ElevenLabs?
Related Reading
- Getting Started with ElevenLabs - Account setup, first generation, and model selection for beginners
- ElevenLabs - Full review with pricing, ratings, and feature breakdown
- Best AI Voice Generators 2026 - How ElevenLabs compares to Murf, LOVO, WellSaid Labs, and others
Related Guides
- Getting Started with ElevenLabs - Account setup and platform basics
- ElevenLabs WordPress Audio Setup - Step-by-step WordPress integration for Audio Native
- ElevenLabs Studio First Project - Manual long-form audio generation in Studio
- ElevenLabs Voice Library Guide - Choosing the right narrator voice
- ElevenLabs Audio Quality Optimization - Stability, similarity, and pronunciation tuning
External Resources
- ElevenLabs Audio Native Documentation - Official setup instructions and API reference
- Schema.org AudioObject Markup - Reference for adding structured data to audio pages
- Google Core Web Vitals - Performance metrics to monitor after embedding the player
Related Guides
- AI Video Creation Tips: 2026 Walkthrough for Teams
- AI Voice Cloning Ethics Best Practices: Complete 2026 Guide
- AI Voiceover Corporate Training With WellSaid Labs
- AI Voiceover Tips: Making Synthetic Voices Sound Human
- ElevenLabs API Setup: Developer Quick Start Guide (2026)
- ElevenLabs Audio Quality Settings: Pro Tips and Settings
- ElevenLabs Audiobook Creation: Long-Form Audiobook
- ElevenLabs Conversational AI Agents: Build Voice Agents
- ElevenLabs Dubbing Studio: Video Translation and Dubbing
- ElevenLabs eLearning Narration: E-Learning Course Narration