Murf AI getting started is the process of creating professional text-to-speech voiceovers using Murf’s 200+ AI voices across 35 languages - all from a browser, with no recording equipment required. From account creation to exported audio takes around 20 minutes, and the free tier provides 10 minutes of voice generation to complete your first project.
You do not need a microphone, a recording studio, or a voice actor to produce professional voiceovers in 2026. Murf AI handles text-to-speech generation with 200+ AI voices across 35 languages, and the entire process from script to exported audio takes less time than most people spend choosing a podcast episode. Whether you need narration for an e-learning course, a YouTube video, a product demo, a voice changer for repurposing existing audio, or an internal training module, the platform gets you from blank page to finished audio without touching any recording equipment.
This Murf AI getting started guide walks you through the complete setup process in about 20 minutes. You will create your account, explore the workspace, generate your first voiceover, customize the output to sound exactly how you want it, and export the final file. By the end, you will have a working Murf AI project and a clear understanding of how to produce voiceovers on your own going forward.
This guide is written for complete beginners. No prior experience with text-to-speech tools or audio production is required. If you already have a Murf account and want to dive into specific features, check out the Murf Studio Workspace Walkthrough or the Murf AI Voice Selection Tips instead.
Prerequisites for Murf AI Getting Started
Before you begin, gather a few things so you can move through each step without interruptions.
A script or text to convert. You do not need a polished final draft, but having at least a paragraph or two of text ready means you can generate a real voiceover during this walkthrough instead of working with placeholder content. A product description, a tutorial introduction, or even a few sentences about your business will work. Aim for 100 to 300 words for your first project.
A modern web browser. Murf runs entirely in the browser - no software to install. Chrome, Edge, Firefox, and Safari all work. Chrome tends to offer the smoothest experience for audio playback and editing.
Headphones or speakers. You will be previewing audio output multiple times during the setup process. Using headphones helps you catch subtle differences between voice options and hear the effect of customization settings like pitch, speed, and emphasis.
A plan decision. Getting started free with Murf AI means activating the free tier, which includes 10 minutes of voice generation and 2 projects - enough to complete this guide and produce a couple of short voiceovers. The Murf free plan tips guide covers how to stretch those 10 minutes. If you know you will need more output, the Basic plan at $29 per month ($19 on annual billing) provides 2 hours per month. The Pro plan at $39 per month ($26 annual) adds voice cloning and emotion control. The Business plan at $99 per month ($66 annual) includes team collaboration and Canva integration. Enterprise pricing is custom and includes access to the Falcon API and Voice Agent APIs. Compare all tiers on the Murf pricing page.
Create Your Murf AI Account
Getting an account set up takes about two minutes. Navigate to the Murf homepage and click the sign-up button in the top right corner.
Step 1: Choose your Murf AI login method. Murf supports email registration and single sign-on through Google. Google SSO is the fastest option if you want to skip the email verification step. If you prefer a separate login, enter your email address and create a password.
Step 2: Complete the onboarding questions. After creating your account, Murf asks a few questions about your intended use case - things like whether you are creating content for e-learning, marketing, YouTube, podcasts, or internal communications. Answer honestly because these responses help Murf surface relevant voice recommendations and templates when you start your first project.
Step 3: Verify your email. If you signed up with email rather than Google SSO, check your inbox for a verification message. Click the confirmation link to activate your account. The email usually arrives within a minute, but check your spam folder if it does not appear.
Step 4: Select your plan. The free tier activates automatically, so you can start creating voiceovers immediately without entering payment information. If you already know you need more capacity, navigate to the billing section and choose your plan. Annual billing saves roughly 35 percent compared to monthly pricing across all tiers.
Configure Your Workspace
Once you are logged in, you land in the Murf Studio - the main workspace where all voiceover creation happens. Take a few minutes to orient yourself before diving into content creation.
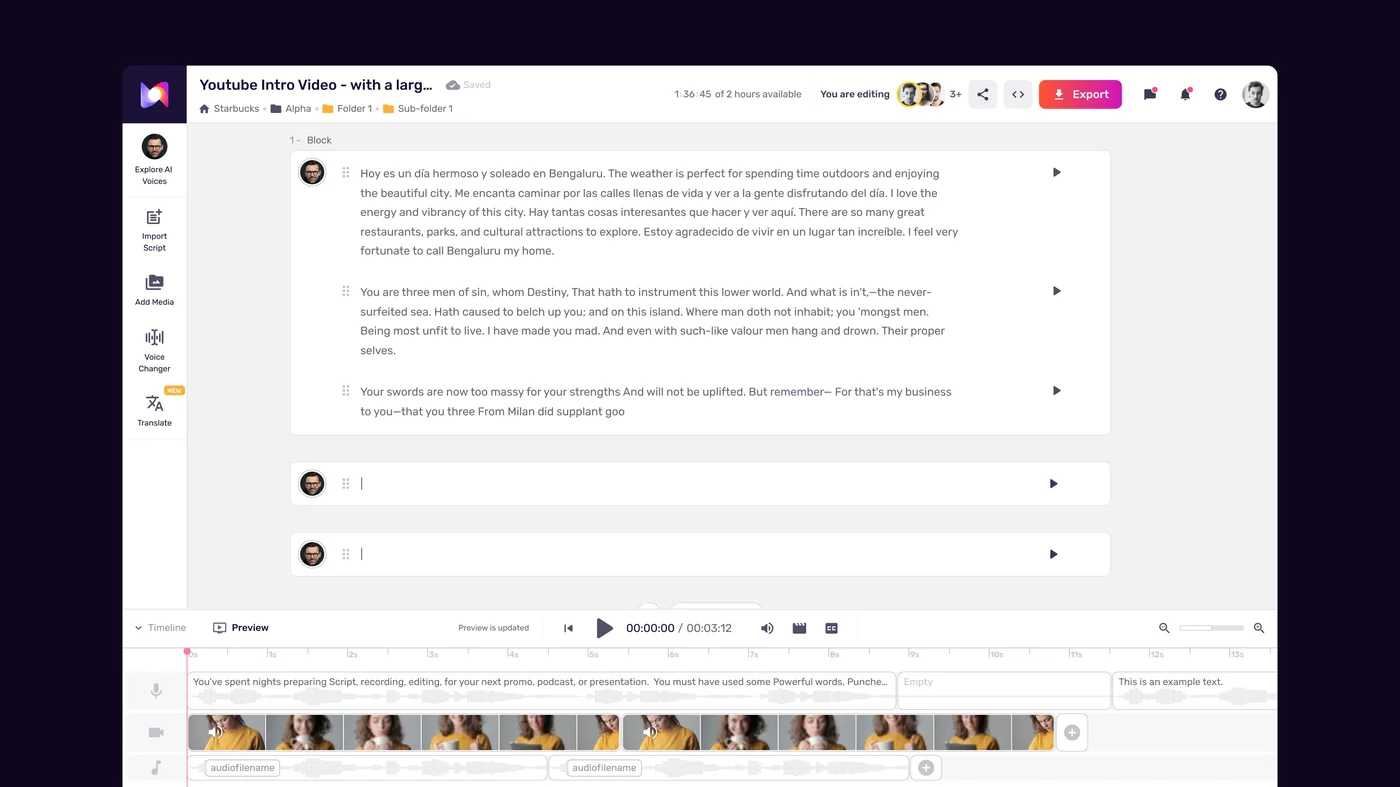
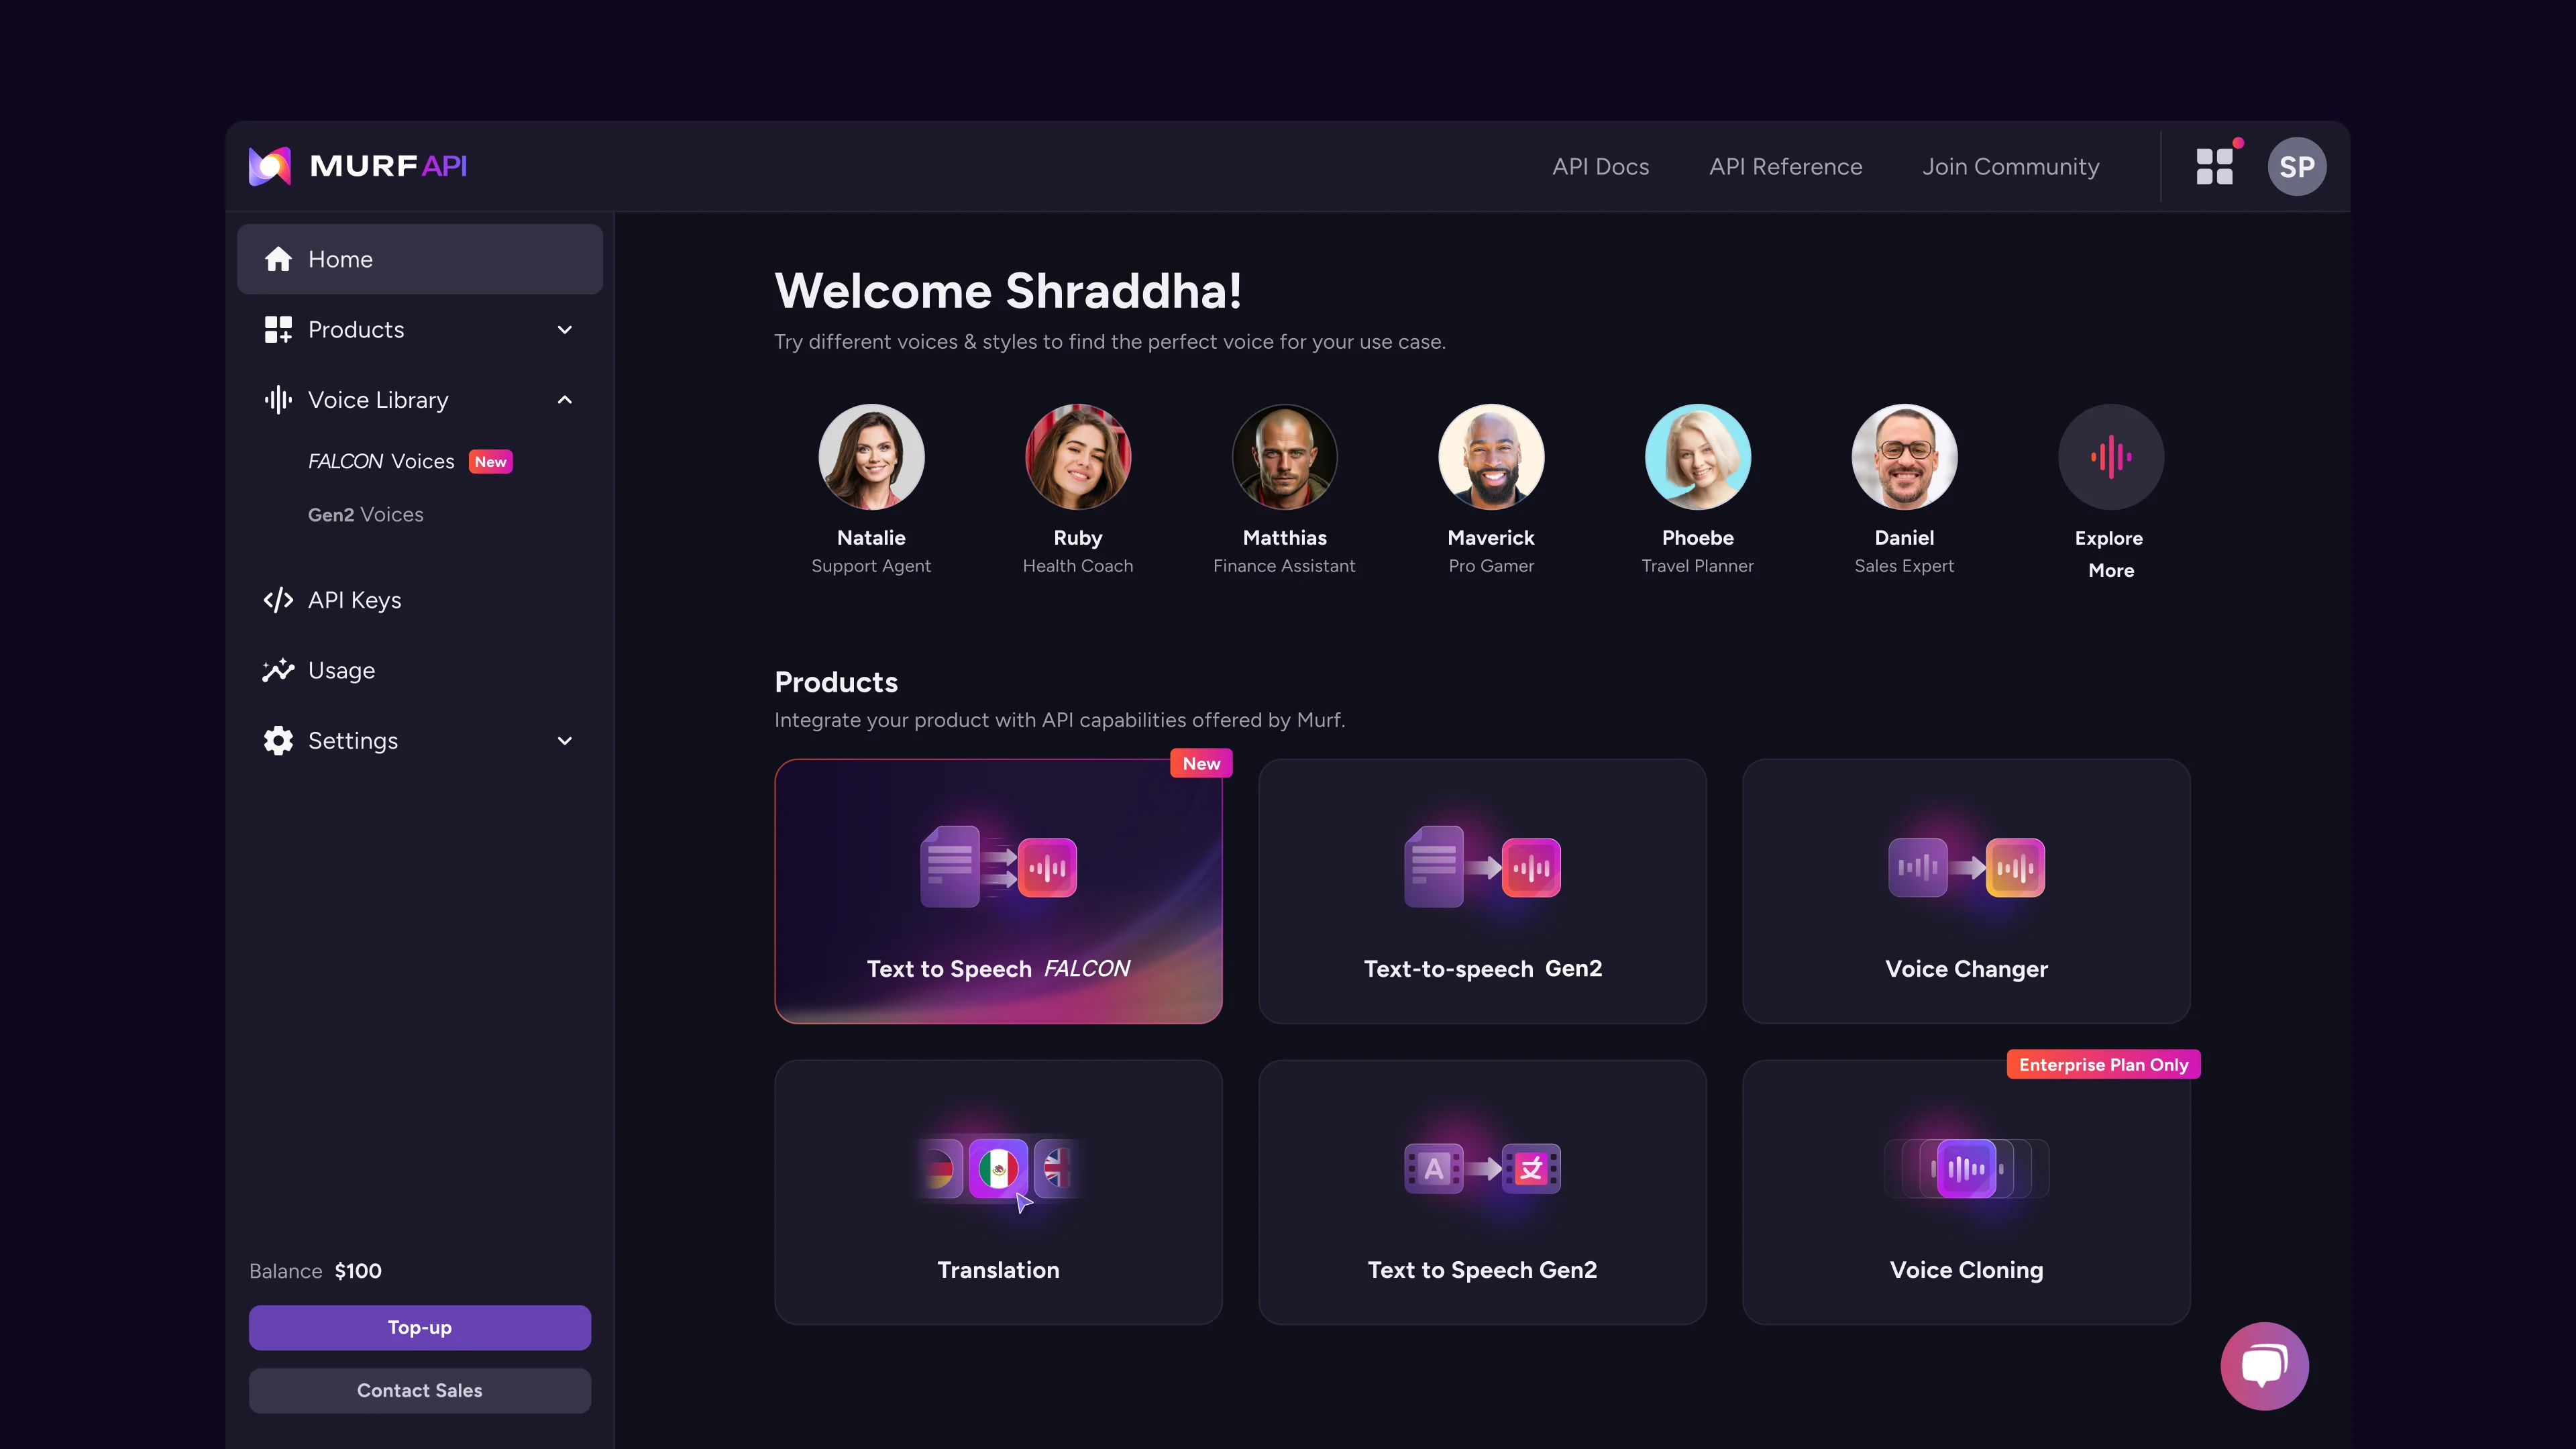
Explore the dashboard. The left sidebar contains your project list, templates, and account settings. The center area is the main editor where you will write scripts, select voices, and customize audio. The top navigation provides access to voice library browsing, project management, and your account. Spend a minute clicking through each section so the layout feels familiar.
Create your first project. Click New Project or the plus icon in the sidebar. Give your project a descriptive name - something like “Product Demo Narration” or “Training Module Intro” rather than “Untitled Project.” Good naming habits save time when you start managing multiple projects.
Set project defaults. Inside the project settings, you can configure default output format (MP3, WAV, or FLAC), sample rate, and quality settings. For most use cases, MP3 at the default quality is perfectly fine. If you are producing audio for broadcast or professional video editing, switch to WAV for lossless quality. These defaults apply to every voiceover in the project, but you can override them at export time.
Check your voice generation balance. In the account or billing area, verify how many minutes of generation you have available. The free plan provides 10 minutes, which is enough to produce several short voiceovers during this guide. Keep an eye on this number as you experiment so you do not run out mid-project.
Generate Your First Voiceover
This is the core of the Murf experience - turning text into spoken audio. The process has three phases: enter your script, choose a voice, and generate the audio.
Step 1: Enter your script. In the project editor, you will see a text input area. Paste or type your prepared script here. Murf processes text in blocks, so you can enter your entire script at once or break it into sections. For your first voiceover, start with a single paragraph of 50 to 150 words so you can hear results quickly and make adjustments without waiting through a long generation.
Step 2: Browse and select a voice. Click the voice selector to open the voice library. Murf organizes its 200+ voices by language, gender, age range, accent, and use case. Use the filters to narrow your options. For example, if you need a professional American English female voice for a tutorial, filter by English, Female, and the “Narration” or “Conversational” style tag. Preview each voice by clicking the play button next to its name - the library plays a sample so you can hear the tone, pacing, and character before committing.
Matching voice to content matters. A corporate training video calls for a clear, measured delivery. A YouTube ad works better with an energetic, conversational tone. A meditation app needs a calm, slow cadence. Murf labels voices with suggested use cases, so lean on those labels for your first project. The Murf AI Voice Selection Tips guide goes deeper into strategies for choosing the right voice, and the Murf pacing pauses speed tips guide covers delivery-rhythm controls.
Step 3: Generate the audio. With your script entered and voice selected, click the Generate button. Murf processes the text and produces audio in a few seconds for short scripts. The generated audio appears on a timeline below the text editor, and you can play it back immediately using the play controls.
Step 4: Listen critically. Play the generated audio through headphones and pay attention to a few things. Does the pacing sound natural? Are there awkward pauses or words that run together? Does the pronunciation of any specialized terms sound off? Make mental notes of anything you want to adjust - the next section covers customization options that address all of these.
Customize Your Output
Raw generation is usually close to what you want, but Murf gives you fine-grained controls to polish the output. These adjustments are what separate a passable voiceover from a professional-sounding one.
Adjust speed and pitch. Select any text block on the timeline and use the speed and pitch sliders to fine-tune the delivery. Slowing down key sentences adds emphasis and gives listeners time to absorb important information. Speeding up transitional phrases keeps the pace moving. Pitch adjustments can make a voice sound slightly warmer (lower pitch) or more energetic (higher pitch) without changing the voice character entirely.
Add pauses. Insert pauses between sentences or sections to create natural breathing room. Murf lets you add pauses of specific durations - a short 0.5-second pause works between related sentences, while a 1 to 2-second pause signals a section break or topic change. Strategic pauses dramatically improve the listening experience, especially for educational content where the audience needs processing time.
Emphasize specific words. Highlight a word or phrase in the script and apply emphasis. This makes the voice stress that word slightly, mimicking how a human speaker would naturally draw attention to key terms. Use emphasis sparingly - if every other word is stressed, none of them stand out.
Fix pronunciation. If Murf mispronounces a technical term, brand name, or uncommon word, use the pronunciation editor to specify the correct phonetic spelling. This is common with industry jargon, acronyms, and proper nouns. You can save pronunciation corrections so they apply across all projects, which saves time if you use the same terminology repeatedly. The Murf AI Pronunciation and Emphasis Guide covers this in detail.
Add background music. Murf includes a library of royalty-free background music tracks. Adding subtle background music works well for marketing videos, product demos, and presentation narration. Keep the music volume low enough that it does not compete with the voice - the music should support the voiceover, not overpower it. For e-learning and training content, skip the music entirely to minimize distraction. The Murf marketing voiceover workflow covers ad-specific delivery, and the Murf podcast intro guide addresses spoken-word audio production.
Preview and iterate. After making adjustments, play the full voiceover again from start to finish. Listen for consistency - does the pacing feel even? Do the pauses land in the right places? Does the emphasis sound natural? Most voiceovers benefit from two or three rounds of adjustment before they are ready for export.
Export Your Finished Voiceover
Once you are satisfied with how the voiceover sounds, exporting the final file is straightforward.

Step 1: Open export settings. Click the Export or Download button in the top right area of the project editor. Murf presents your output format options.
Step 2: Choose your format. Select the audio format that matches your use case:
- MP3 - Best for web content, podcasts, YouTube videos, and any scenario where file size matters. Good audio quality at a fraction of the file size of uncompressed formats.
- WAV - Lossless quality, best for professional video editing, broadcast, or when you plan to do additional audio post-production in tools like Adobe Audition or Audacity.
- FLAC - Compressed lossless format that offers WAV quality at smaller file sizes. Good middle ground if you want high quality without massive files.
Step 3: Configure quality settings. Depending on your format choice, you may have options for sample rate and bitrate. The defaults work for most use cases. If you are producing for broadcast standards, match the sample rate to your project requirements (typically 44.1 kHz or 48 kHz).
Step 4: Download the file. Click the export button and Murf generates and downloads your file. For short voiceovers, this happens almost instantly. Longer projects may take a few seconds to process before the download begins.
Step 5: Verify the exported file. Open the downloaded file in your preferred media player and listen through it one final time. Confirm the audio sounds identical to the in-app preview, the file plays without errors, and the format is correct for your intended use. This final check catches rare encoding issues before the audio reaches its destination.
Next Steps
You now have a working Murf AI setup and a completed voiceover project. Here is where to go from here to get more value out of the platform.
Explore the full Studio workspace. The workspace has more depth than what you used in this guide. Timeline editing, multi-voice projects, media syncing, and collaboration tools are all available once you move beyond single-voice scripts. The Murf Studio Workspace Walkthrough covers the entire interface in detail.
Try voice cloning. If you are on the Pro plan or above, Murf Voice Cloning 2.0 lets you create a digital replica of your own voice or a licensed voice. This is valuable for brands that want consistent voice identity across all content without recording every piece manually. The Murf AI Voice Cloning 2.0 Setup Guide walks through the entire process.
Experiment with emotion controls. Pro plan users also get access to emotion settings that adjust how the AI voice delivers lines - adding happiness, sadness, excitement, or calm to specific sections. This feature is powerful for storytelling, marketing, and any content where emotional resonance matters. The Murf AI Emotion Controls Guide explains how to use these settings effectively.
Explore multilingual capabilities. Murf MultiNative technology allows you to produce content in 35 languages while maintaining natural pronunciation and voice character. If your audience spans multiple languages, the Murf MultiNative Multilingual Guide covers language switching, accent handling, and multilingual project workflows.
Learn the Falcon model. Murf Falcon is the latest AI voice model offering ultra-low latency (55ms) and improved naturalness. Enterprise users can access the Falcon API for real-time voice applications, conversational AI, and high-volume production - the Murf Falcon API quickstart walks through a complete integration. If you are building voice-enabled products, also see the Murf voice agent API guide for the conversational pipeline.
Frequently Asked Questions
Is Murf AI free to use?
Yes, Murf offers a free tier that includes 10 minutes of voice generation and 2 projects. This is enough to test the platform, complete this entire guide, and produce a few short voiceovers. No credit card is required to start. When you need more capacity, paid plans start at $29 per month ($19 with annual billing) for the Basic tier, which provides 2 hours of generation per month. Compare all options on the pricing page.
How natural do the AI voices sound?
Murf voices have improved significantly with recent model updates, especially the Falcon model. For most use cases - e-learning, YouTube narration, product demos, marketing videos - the output sounds polished enough that listeners would not immediately identify it as AI-generated. The naturalness depends on three factors: choosing the right voice for your content type, adjusting pacing and emphasis to match natural speech patterns, and using the pronunciation tools for specialized terms. The quality gap between AI voices and human voice actors has narrowed considerably, though voices performing highly emotional or comedic content still benefit from human recording.
Can I use Murf voiceovers commercially?
Yes. All paid plans include commercial usage rights for the voiceovers you generate. You can use the audio in YouTube videos, online courses, advertisements, podcasts, apps, and products you sell. The free tier is limited to personal and trial use. If you plan to use voiceovers in client work or commercial products, make sure you are on a paid plan. Voice cloning has additional terms - you can only clone voices you have the legal right to use (your own voice or voices with explicit consent from the speaker).
What languages does Murf support?
Murf supports 35 languages including English (with American, British, Australian, and Indian accents), Spanish, French, German, Portuguese, Italian, Hindi, Japanese, Korean, Chinese (Mandarin), Arabic, Dutch, and many more. The MultiNative feature allows a single voice to speak multiple languages naturally, which is useful for multilingual content where you want voice consistency across language versions. Language availability varies slightly by plan tier, so check the text-to-speech page for the current list.
How does Murf compare to recording with a real microphone?
For consistent, scalable audio production, Murf offers clear advantages: no recording environment to set up, no retakes for stumbles or background noise, instant edits by changing the script text, and the ability to produce hours of content in minutes. Human recording still has the edge for highly emotional performances, comedic timing, and situations where authentic personality is the priority. Many creators use a hybrid approach - Murf for high-volume content like course modules and documentation, and human recording for flagship content like podcast intros and brand videos. The right choice depends on your volume, budget, and how critical vocal personality is for your specific content.
Want to learn more about Murf AI?
Related Reading
Related Guides
- Murf Studio Workspace Walkthrough
- Murf Text-to-Speech Tutorial
- Choosing the Right AI Voice in Murf
- Murf AI Free Plan Tips
- Murf AI Voice Cloning Setup
External Resources
- Murf AI Pricing - Compare free, Basic, Pro, Business, and Enterprise plan tiers
- Murf Text-to-Speech - Explore the full voice library with 200+ AI voices across 35 languages
- Murf AI Help Center - Official documentation for studio editor, voice library, and account settings
Related Guides
- AI Voiceover Corporate Training With WellSaid Labs
- AI Voiceover for YouTube Videos: Murf Workflow Guide 2026
- AI Voiceover Tips: Making Synthetic Voices Sound Human
- ElevenLabs Getting Started: Complete Beginners Guide
- ElevenLabs Voice Cloning Tutorial: Complete 2026 Guide
- Luma Dream Machine Video Tutorial 2026: Text-to-Video & Ray3
- Murf AI Canva Integration: Add Voiceovers to Designs
- Murf AI Custom Pronunciation: Say It My Way Guide (2026)
- Murf AI Dubbing: Complete Walkthrough | Complete Guide 2026
- Murf AI eLearning Narration: Educator's Guide | Review 2026