Tidio getting started does not have to be complicated. If you run a small business or an online store, you already know the problem: customers expect instant answers, your inbox is overflowing, and hiring a full support team is not in the budget. Tidio solves this by combining live chat, AI-powered automation, and chatbot flows into a single platform that you can set up in about 20 minutes. Over 300,000 businesses use it to handle customer conversations without burning out their teams.
This guide walks you through the complete Tidio getting started process from account creation to your first automated conversation. You will install the chat widget on your website, configure its appearance, set up Lyro AI to handle common questions automatically, invite your team, and build your first chatbot flow. By the end, you will have a working Tidio setup that is ready to engage visitors and resolve support tickets around the clock.
This is written for beginners who are either brand new to live chat tools or switching from another platform like Intercom or Zendesk Chat. No coding experience is required. If you are specifically looking to set up Tidio on a Shopify store, the Tidio Shopify Integration Guide covers that workflow in detail.
Prerequisites
Before you start the tidio getting started setup process, gather a few things so you can move through each step without stopping to hunt for information.
A website where you want to add live chat. Tidio works with any website platform - WordPress, Shopify, Wix, Squarespace, custom-built sites, or anything else that lets you add a code snippet or install a plugin. You need admin access to your site to install the chat widget.
A business email address. Use your company email rather than a personal Gmail or Outlook account. This keeps your support communications professional and helps with team management down the road.
Basic information about your products or services. When you set up Lyro AI later in this guide, you will need to provide knowledge base content so the AI can answer customer questions accurately. Having a clear understanding of your FAQs, pricing, shipping policies, and return procedures will speed up that process.
A plan or free trial. Tidio offers a free plan that includes 50 conversations per month, up to 3 operators, and 50 one-time Lyro AI conversations. The 7-day free trial gives you access to all premium features without a credit card. For most small businesses just getting started, the free plan is enough to evaluate the platform. If you need more volume, the Starter plan runs $29 per month and the Growth plan is $59 per month. Compare all tiers on the pricing page.
Tidio Getting Started: Create Your Account
The signup process takes about two minutes, and Tidio’s onboarding wizard configures the basics for you based on your answers.
Step 1: Sign up at Tidio’s website. Navigate to tidio.com and click the sign-up button. Enter your email address and create a password, or sign up with your Google account for faster access. No credit card is required for the free plan or the 7-day trial.
Step 2: Complete the onboarding questionnaire. Tidio asks several questions about your business during setup. You will enter your name, your website URL, your industry, and what you want to accomplish with live chat (generate leads, support customers, increase sales). If you are specifically evaluating Tidio for an online store, the best AI chatbots for e-commerce roundup provides useful context on how Tidio stacks up. Answer these honestly - the platform uses your responses to suggest relevant chatbot templates and configure default settings.
Step 3: Choose your primary goal. The wizard asks whether you primarily want to automate customer support, capture leads, or boost sales. This selection determines which chatbot templates and Flow suggestions appear in your dashboard. You can always change this later, but choosing the closest match saves configuration time.
Step 4: Preview your widget. After completing the questionnaire, Tidio shows you a preview of how the chat widget will look on your website. You can adjust the color scheme and position at this stage or skip ahead and customize it later in the settings panel.
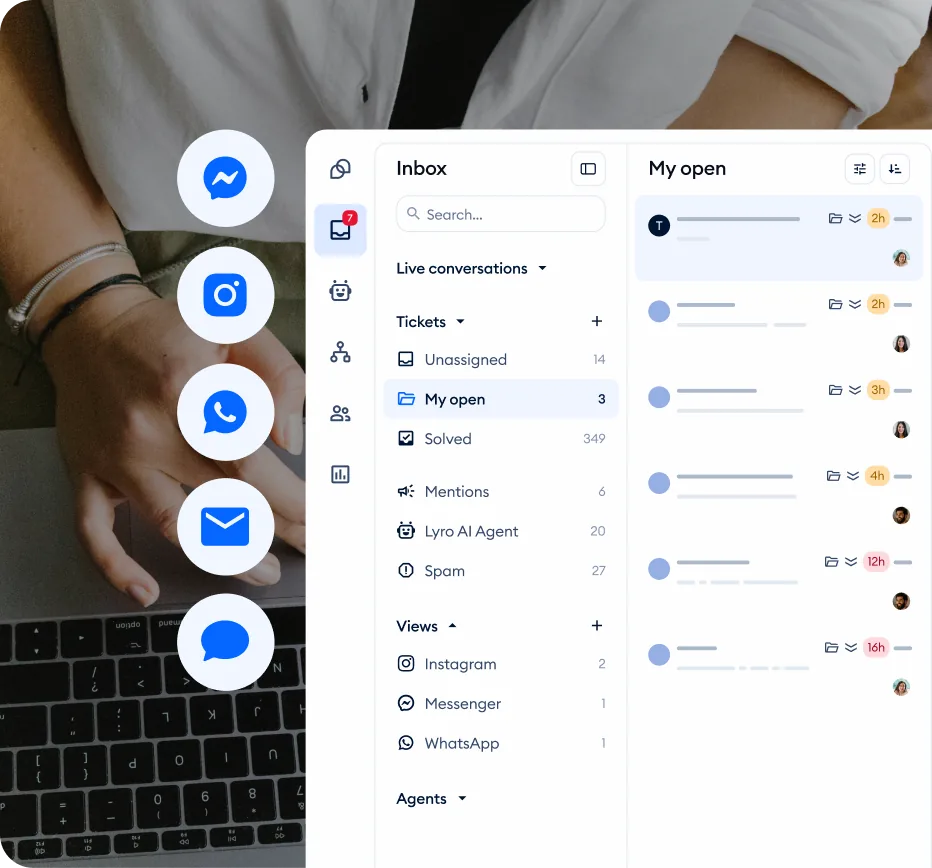
Once you complete the onboarding wizard, you land on the Tidio dashboard - the central hub where you manage all conversations, chatbot flows, contacts, and settings.
Install the Chat Widget
The chat widget is the floating icon your visitors click to start a conversation. Installation method depends on your website platform.
WordPress: Install the Tidio plugin. Log into your WordPress admin dashboard and navigate to Plugins > Add New. Search for “Tidio” and install the official Tidio Live Chat & AI Chatbots plugin. Click Activate, then follow the prompts to connect your Tidio account. The widget appears on your site automatically after activation.
Shopify: Install the Shopify app. Open the Shopify App Store and search for “Tidio.” Install the official app and authorize the required permissions. Tidio syncs with your Shopify product catalog, customer data, and order information automatically. For a detailed walkthrough, see the Tidio Shopify Integration Guide.
Other platforms: Add the JavaScript snippet. For Wix, Squarespace, custom HTML sites, or any other platform, use the manual installation method. In your Tidio dashboard, navigate to Settings > Installation. Copy the JavaScript code snippet provided. Paste it into your website’s HTML, just before the closing </body> tag. If you use a website builder that supports custom code injection, add the snippet in that section.
Verify the installation. Open your website in a new browser tab (or an incognito window to avoid caching issues). You should see the Tidio chat widget - typically a small chat bubble - in the bottom-right corner of the page. Click it to confirm the chat window opens correctly. If the widget does not appear, clear your browser cache and reload the page. Widget changes can take a few minutes to propagate.
Configure Your Widget Appearance
A well-configured widget matches your brand and sets the right expectations for visitors. Navigate to Settings > Channels > Live Chat > Appearance to access all customization options.
Set your brand colors. Choose a primary color that matches your website’s color scheme. Tidio applies this color to the chat widget button, header bar, and message bubbles. Consistency with your brand makes the chat feel native to your site rather than a third-party add-on.
Choose the widget position. The default position is the bottom-right corner, which is the standard placement most visitors expect. You can switch to bottom-left if your site has conflicting elements in the right corner, such as a scroll-to-top button or cookie consent banner.
Configure your welcome message. Navigate to Settings > Channels > Live Chat > Visitor Notifications. This is the message that appears in a small popup above the chat widget when a visitor first arrives on your site. Keep it conversational and specific - something like “Hi there! Have questions about our products? We are here to help.” is more effective than a generic “How can I help you?” A good welcome message increases chat engagement rates significantly.
Set operating hours. Under Settings > Channels > Live Chat > Operating Hours, define the hours when your team is available for live conversation. Outside these hours, the widget can display an offline message, show a contact form for visitors to leave their email and question, or hand off entirely to Lyro AI. Our Lyro AI setup guide covers advanced configuration in detail. This prevents visitors from waiting for a reply that will not come until the next business day.
Configure online and offline messages. Set a separate greeting for when your team is online versus offline. During business hours, you might use “We typically reply within a few minutes.” For offline hours, try “We are currently offline but will respond by [time]. Leave your email and we will get back to you.” These messages manage expectations and reduce frustration.
Set Up Lyro AI
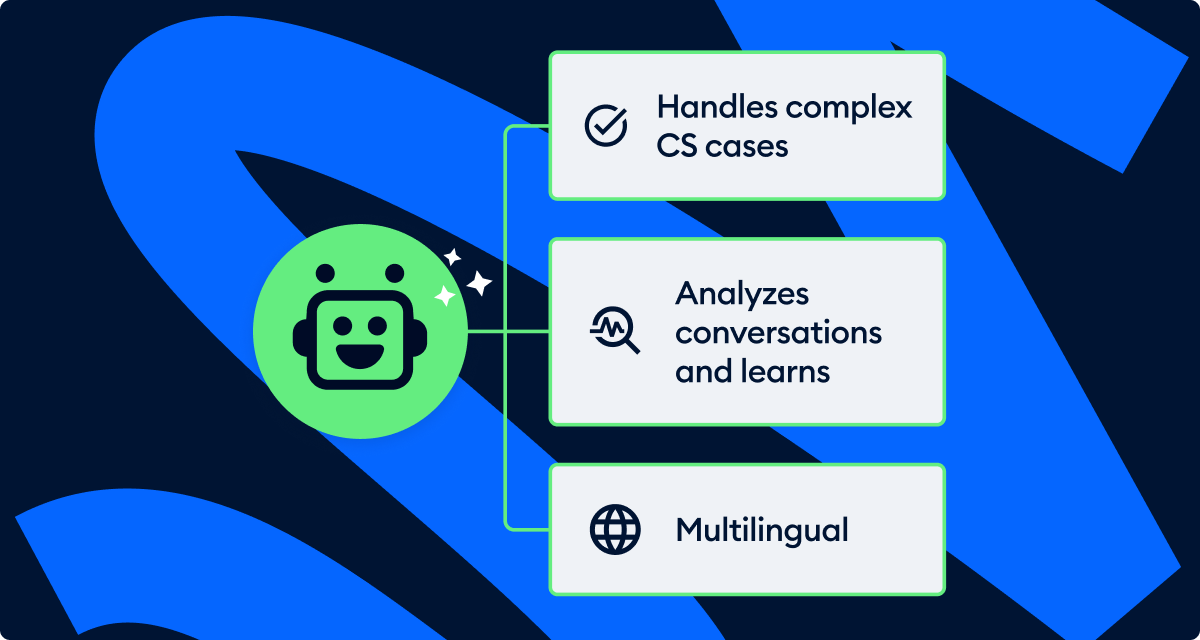
Lyro is Tidio’s AI-powered chatbot - built on Anthropic’s Claude - that learns from your knowledge base and handles customer questions automatically. Setting it up properly is the single most impactful step in this guide because a well-configured Lyro can resolve up to 67% of customer inquiries without human intervention.
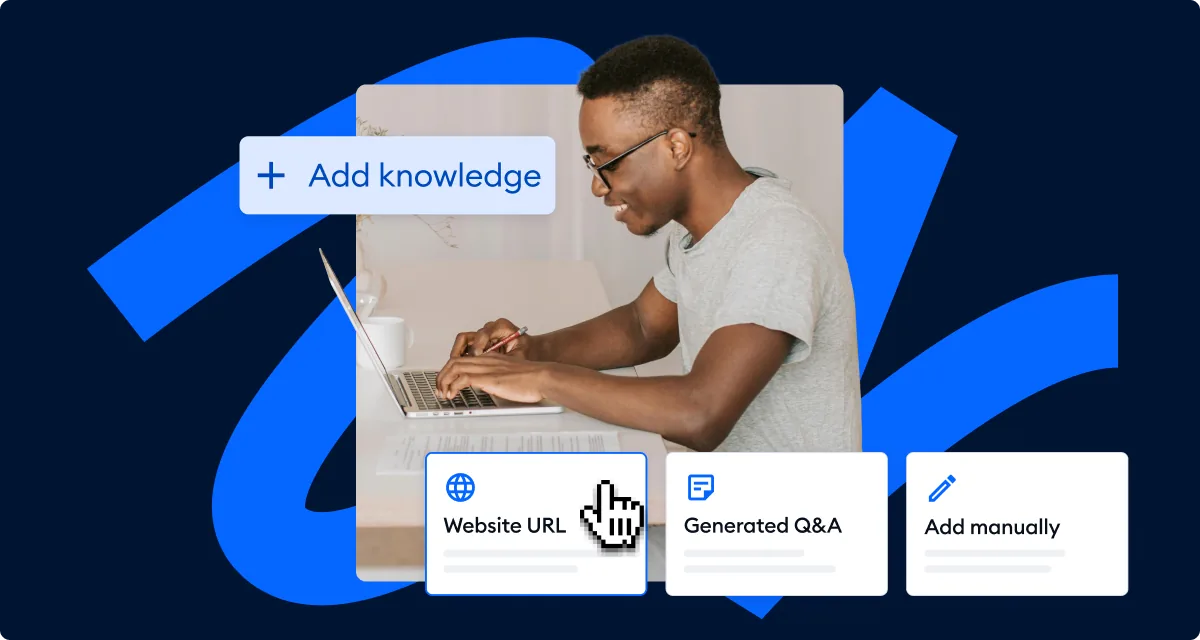
Step 1: Navigate to the Lyro panel. In your Tidio dashboard, click on Lyro AI in the left sidebar. This opens the Lyro configuration area where you manage its knowledge base, behavior settings, and test conversations.
Step 2: Add knowledge base sources. Lyro needs information about your business to answer questions accurately. You have two primary methods for adding knowledge:
- Website scraping: Provide your website URL and Lyro automatically crawls your pages to extract product information, FAQs, policies, and other content. This is the fastest way to get started. Navigate to Lyro AI > Knowledge > Data Sources and enter your website URL. Lyro processes the content and creates question-answer pairs from what it finds.
- Manual Q&A pairs: Add specific questions and answers that you want Lyro to handle. This is useful for information that is not on your website or for fine-tuning responses. Navigate to Lyro AI > Knowledge > Q&A and click Add Q&A to create entries. Common entries include pricing details, shipping timelines, return policies, and product specifications.
Review the extracted content carefully. Remove any outdated information and add Q&A pairs for your most frequently asked questions. The quality of Lyro’s responses depends directly on the quality and accuracy of its knowledge base. For a deep dive into structuring knowledge effectively, see the Lyro knowledge base guide.
Step 3: Configure Lyro’s tone and behavior. Navigate to Lyro AI > Personality to adjust how the AI communicates. You can set the tone of voice (professional, friendly, or casual) and customize the AI’s name. If your brand has a specific voice - formal and corporate, or warm and conversational - match Lyro’s personality to it so the transition between AI and human agents feels seamless. The Lyro tone customization guide walks through advanced personality settings.
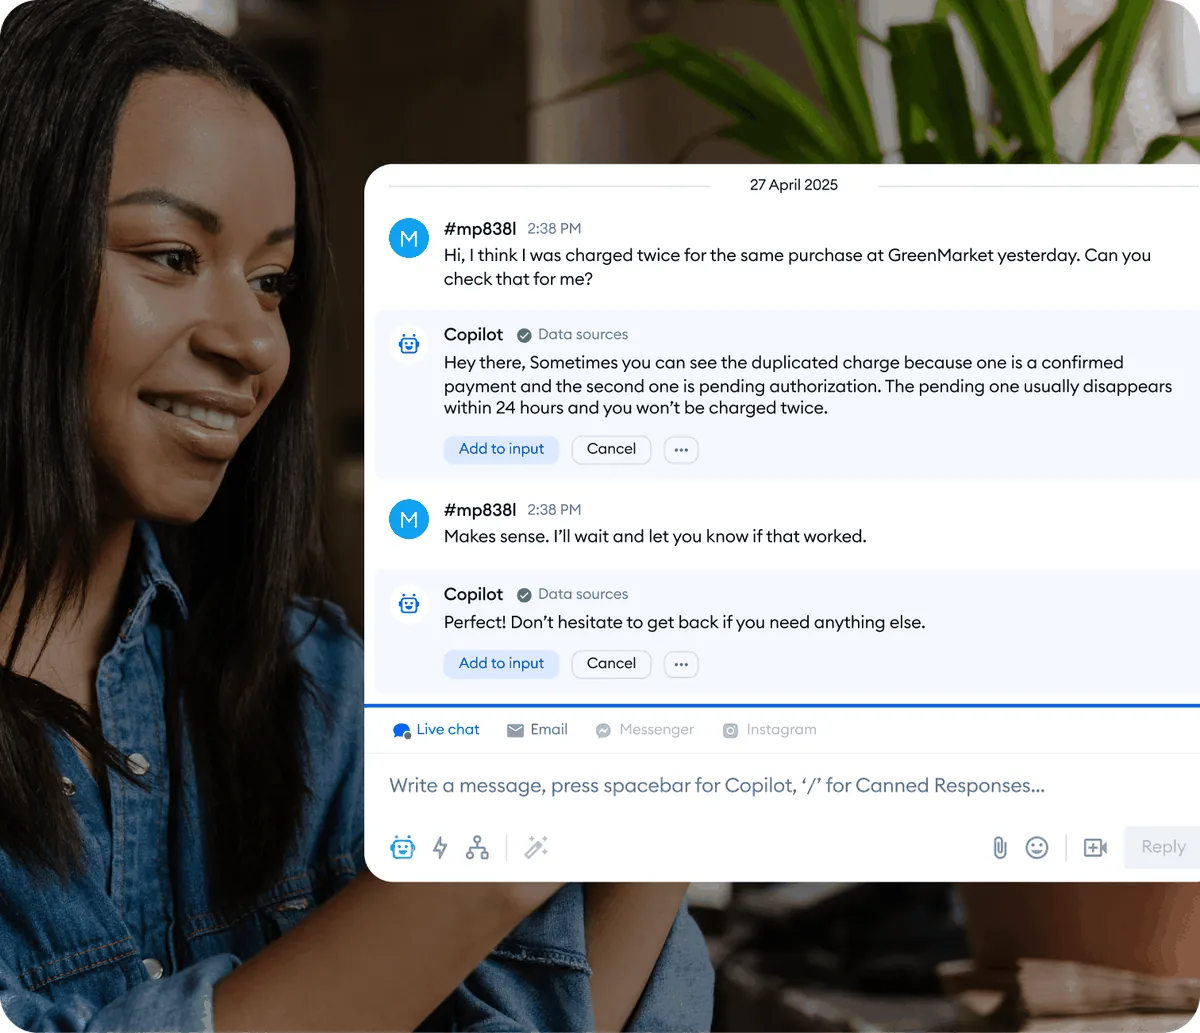
Step 4: Set up handoff rules. Under Lyro AI > Settings, configure when Lyro should transfer a conversation to a human agent. Common triggers include: the customer explicitly asks for a human, Lyro cannot find a confident answer, or the conversation involves a sensitive topic like billing disputes or complaints. Proper handoff configuration ensures customers never feel trapped in an unhelpful AI loop.
Step 5: Test in the Playground. Before deploying Lyro to real visitors, use the built-in Playground to test its responses. Navigate to Lyro AI > Playground and type in common customer questions. Verify that the answers are accurate, the tone matches your brand, and the AI handles edge cases gracefully. If an answer is wrong or incomplete, go back to the knowledge base and add or update the relevant Q&A pair. Our Lyro Playground testing guide covers systematic testing strategies.
The free plan includes 50 one-time Lyro AI conversations, which is enough to test the feature thoroughly. If you decide to scale Lyro for production use, the Lyro AI add-on starts at $39 per month for 100 AI conversations.
Add Your Team
If you have team members who will handle live chat conversations, invite them now so they can start responding to customer inquiries.
Invite agents. Navigate to Settings > Team and click Invite Team Member. Enter each team member’s email address and select their role. Tidio offers several role levels:
| Field | Value |
|---|---|
| Admin | Full access to all settings, billing, and team management |
| Operator | Can handle conversations, view contacts, and use chatbot tools but cannot change account settings or billing |
| Viewer | Read-only access to conversations and analytics |
Configure notifications. Each team member should configure their notification preferences under their profile settings. Tidio supports desktop notifications, email notifications, and mobile push notifications (via the Tidio mobile app). Recommend that your team installs the mobile app so they receive alerts for new conversations even when they are away from their desk.
Set up chat assignment. Under Settings > Channels > Live Chat > Chat Assignment, you can choose how incoming conversations are distributed. Options include round-robin (evenly distributed), load-balanced (assigned to the agent with the fewest active chats), or manual (agents pick up conversations from a shared queue). For small teams of two to three people, round-robin works well. The free plan supports up to 3 operators, which is sufficient for most small businesses getting started.
Build Your First Chatbot Flow
Beyond Lyro AI, Tidio includes a visual chatbot builder called Flows that lets you create automated conversation paths for specific scenarios. The Tidio Flows automation guide covers advanced flow building in depth. Think of Flows as scripted interactions - they follow a predetermined path based on visitor actions and inputs.
Step 1: Choose a template. Navigate to Flows in the left sidebar and click Create a New Flow. Tidio offers dozens of pre-built templates organized by goal: lead generation, customer support, e-commerce, and more. For your first flow, start with the Welcome Message template - it greets visitors who open the chat widget and asks what they need help with.
Step 2: Understand the visual builder. The Flow builder uses a drag-and-drop interface with three types of elements:
- Triggers: Events that start the flow (visitor opens chat, visits a specific page, returns to your site)
- Actions: Things the chatbot does (send a message, ask a question, collect an email, assign to an agent)
- Conditions: Decision points that branch the flow based on visitor responses or data
Step 3: Customize the welcome flow. Open the Welcome Message template and modify it to match your business. Change the greeting text to match your brand voice. Update the quick-reply buttons to reflect the most common reasons visitors contact you - for example, “Product questions,” “Shipping info,” “Talk to sales,” and “Technical support.” Each button can lead to a different branch in the flow, routing visitors to the right information or team member.
Step 4: Add a lead collection step. In one of the flow branches - typically the “Talk to sales” path - add a step that asks for the visitor’s email address and name. Tidio stores this information in the Contacts section, creating a new contact record automatically. This turns anonymous website visitors into identifiable leads that your sales team can follow up with.
Step 5: Activate the flow. Toggle the flow to active and it begins running immediately for new visitors. You can monitor its performance in the Flow analytics, which shows how many visitors triggered it, completed it, and provided their contact information. Adjust the messaging and branching based on what the data shows.
Tidio Getting Started: Essential Settings Checklist
Before you consider your setup complete, review these additional settings that many beginners overlook.
Pre-chat survey. Navigate to Settings > Channels > Live Chat > Pre-chat Survey. Enable this to collect visitor name and email before the conversation starts. This ensures you can follow up even if the visitor disconnects, and it creates a contact record in your database.
CSAT surveys. Under Settings > Customer Satisfaction, enable post-conversation satisfaction surveys. These appear after a chat ends and ask the customer to rate their experience. CSAT scores help you identify which agents perform well and where your customer service automation process needs improvement.
Canned responses. Navigate to Settings > Canned Responses and create templates for your most common replies. Responses like order status updates, return policy explanations, and links to documentation save agents time and ensure consistency. Agents can insert canned responses with a keyboard shortcut during live conversations.
Mobile app. Download the Tidio mobile app (available for iOS and Android) and log in with your account credentials. The mobile app ensures you can respond to customer conversations when you are away from your computer, which is critical for small teams that cannot staff a dedicated support desk at all times.
Email forwarding. Under Settings > Channels > Email, configure email forwarding so that any messages sent to your support email address (like [email protected]) appear in the Tidio inbox alongside chat conversations. This centralizes all customer communication in one place.
Next Steps After Tidio Getting Started
You now have a working Tidio setup with a live chat widget, Lyro AI handling common questions, team members ready to respond, and a chatbot flow engaging visitors. The tidio getting started phase is complete - here is where to go from here.
Deepen your Lyro AI knowledge base. The more Q&A pairs and website content you add to Lyro, the higher its automation rate climbs. Review conversations that Lyro could not answer and add that information to the knowledge base. Aim to add 10-20 new Q&A pairs per week for the first month until Lyro covers the majority of your common inquiries.
Build more chatbot flows. The welcome message flow is a starting point. Create additional flows for abandoned cart recovery (if you run an e-commerce store), appointment booking, product recommendations, and lead qualification. Each flow you add reduces the volume of repetitive questions that reach your human agents.
Explore analytics. Navigate to Analytics in the left sidebar to monitor chat volume, response times, CSAT scores, and Lyro’s resolution rate. Use this data to identify peak hours (so you can staff accordingly), common questions (so you can improve your knowledge base), and drop-off points in your chatbot flows. The Tidio analytics dashboard guide walks through every metric in detail.
Connect integrations. Tidio integrates with CRM tools, email marketing platforms, help desk software, and e-commerce platforms. Connect the tools your team already uses - such as HubSpot, Mailchimp, or Shopify - so customer data flows between systems automatically. See our best CRM with AI roundup for tools that pair well with Tidio.
The Bottom Line: Tidio Getting Started in 20 Minutes
A complete tidio getting started flow takes about 20 minutes once you have your website access and business information ready. The investment pays off immediately - your chat widget is live, Lyro AI is answering common questions automatically, your team is ready to handle escalations, and your first chatbot flow is capturing leads. From here, the work shifts from setup to refinement: expanding the Lyro knowledge base, building more flows, and using the analytics to fine-tune what your customers actually need.
Frequently Asked Questions
How long does it take to set up Tidio?
A basic working setup takes about 20 minutes if you have your website access and business information ready. This covers account creation, widget installation, basic appearance customization, and initial Lyro AI configuration. Building out a comprehensive knowledge base and creating multiple chatbot flows is an ongoing process that improves over the first few weeks as you learn which questions your customers ask most frequently.
Do I need technical skills to get started?
No. WordPress and Shopify users install Tidio through a plugin or app with no code involved. For other platforms, you paste a single JavaScript snippet into your site’s HTML - Tidio provides the exact code and instructions for where to place it. The chatbot builder, Lyro AI setup, and all configuration happen through the visual dashboard without writing any code.
What plan should I start with?
Start with the free plan or the 7-day free trial to evaluate the platform. The free plan includes 50 conversations per month, 3 operators, and 50 one-time Lyro AI conversations. This is enough for most small businesses to test the core features. If you need more conversation volume, upgrade to the Starter plan at $29 per month (100 conversations) or the Growth plan at $59 per month (250 conversations with advanced analytics). Compare all options on the pricing page.
How many conversations does Lyro handle for free?
The free plan includes 50 one-time Lyro AI conversations. Once those are used, Lyro stops responding automatically and conversations are routed to human agents. If you want ongoing AI automation, the Lyro add-on starts at $39 per month for 100 AI conversations, with higher tiers available for businesses that need more volume. Given that Lyro achieves an average 67% automation rate, 100 AI conversations per month can significantly reduce your support workload.
Can I use Tidio on multiple websites?
Each Tidio project is tied to a single website. If you want to run Tidio on multiple websites, you need separate projects. The free plan allows one project. Paid plans (Growth and above) support multiple projects, and the Plus plan includes multi-project support as a standard feature. Each project has its own widget, knowledge base, flows, and analytics, which makes sense because different websites typically serve different audiences with different support needs.
Want to learn more about Tidio?
Related Guides
- Tidio + Shopify Integration Guide - Detailed setup for Shopify stores
- Lyro AI Setup Guide - Deep dive into configuring Lyro AI
- Tidio Flows Automation Guide - Build advanced chatbot workflows
- Tidio Ecommerce Support Strategies - Best practices for ecommerce
- Tidio Live Chat Customization - Brand-match your widget appearance
Related Reading
- Tidio Review
- Tidio + Shopify Integration Guide
- Tidio Ecommerce Support Strategies - Automation best practices for scaling ecommerce customer service
- Best Live Chat Software 2026
- Best AI Chatbot Platforms 2026
- Best Customer Support Software 2026
External Resources
- Tidio Help Center - Official documentation covering installation, integrations, and Lyro AI configuration
- Tidio Blog - Customer service automation strategies, case studies, and feature updates
- Tidio Pricing Page - Compare Free, Starter, Growth, Plus, and Premium tiers
- Lyro AI Agent - AI-powered customer service with 67% automation rate
Related Guides
- ActiveCampaign AI Features: Active Intelligence Guide
- ActiveCampaign Email Automation: 10 Workflows That Work
- ActiveCampaign Zapier: 10 Automations to Build Today
- AI Chatbots Customer Service Setup: Complete 2026 Guide
- AI Customer Service Automation: Chatbots vs Agentic AI
- AI Workflow Automation Maturity Model: 5 Levels
- Building AI First Workflows: A Practitioner's 2026 Guide
- Building Mcp Servers Guide: 2026 Walkthrough for Teams
- ChatGPT Prompts 2026: Basic vs Engineered, 18 Examples
- ChatGPT Tips And Tricks: 2026 Walkthrough for Teams