The Tidio ticketing system solves a problem that every growing support team eventually hits: conversations pile up, some get lost, and nobody can tell which issues are urgent, which are waiting on a customer reply, and which fell through the cracks last Tuesday. Live chat and the Tidio chatbot are great for real-time exchanges, but not every customer issue gets resolved in a single conversation. Refund requests need manager approval. Bug reports need developer input. Shipping disputes need warehouse confirmation. These are multi-step problems that demand tracking, and that is exactly what ticketing provides - a structured layer on top of your conversations that turns chaotic message threads into organized, assignable, prioritized work items.
This guide walks through the complete process of setting up ticketing in Tidio, creating tickets from live conversations, building custom views to manage your queue, configuring priority levels and SLA targets, setting up routing rules for automatic assignment, connecting your email channel, and measuring resolution performance. The Tidio ticketing system fits inside the same shared inbox you already use, which is why migration from chat-only to ticketed workflows is so cheap. Whether you are a small business handling twenty tickets a week or a growing team managing hundreds, these steps apply.
When to Use Ticketing
Not every conversation needs a ticket. Quick questions - “What are your hours?” or “Do you ship to Canada?” - are better handled through live chat or Lyro AI and closed immediately. Ticketing adds value when conversations have characteristics that make them hard to manage in a simple chat queue.
Multi-step resolution. The customer’s issue requires action from someone other than the agent who received the message. A refund needs finance team approval. A technical bug needs a developer to investigate (often tracked in Jira or Linear). A custom order needs a product specialist to confirm feasibility. Without a ticket, these requests float in chat history and depend on someone remembering to follow up.
Asynchronous communication. The customer sends a message, your team investigates for a few hours or days, then responds with a resolution. Chat threads are not designed for this rhythm - they work best for back-and-forth exchanges that happen in minutes, not days. Tickets give you a container that stays visible and trackable regardless of how long the resolution takes (the GitLab handbook on async communication is a great primer).
Accountability tracking. When you need to know who is responsible for an issue, when it was assigned, how long it has been open, and whether it met your response time targets, a ticket provides that audit trail similar to how audit trails are used in regulated industries. Chat conversations do not inherently track ownership or deadlines.
Pattern identification. Tickets with categories and tags let you spot trends over time, similar to how PostHog surfaces product-usage patterns. If you see a spike in tickets about a specific product or feature, that data informs product decisions, knowledge base updates, and staffing adjustments. Unstructured chat conversations make this kind of analysis nearly impossible.
The general rule: if a conversation will be resolved within a single chat session by a single agent, keep it as a conversation. If it needs handoffs, investigation time, or follow-up actions, create a ticket.
Prerequisites
Before enabling ticketing, make sure you have these pieces in place.
An active Tidio account with the chat widget installed. Ticketing is built into the Tidio platform and creates tickets from your existing conversation channels. If you have not set up your account yet, start with the Getting Started with Tidio guide.
A paid Tidio plan. Ticketing features are available on Tidio’s paid plans - if you are wondering whether Tidio is free, the free plan does not include the full ticketing system. Review Tidio pricing on the pricing page to confirm which tier covers ticketing before you sign up, and check the AI agent page if you also want Lyro to auto-create tickets.
At least one support agent. Ticketing is about assigning work to people. You need at least one agent set up in your Tidio account, though the real value of ticketing becomes apparent with two or more agents who need to coordinate and hand off issues. See the Getting Started with Tidio guide for setting up your team.
A rough idea of your support categories. Before you start creating tickets, think about how you want to organize them. Common categories include billing, technical support, shipping, returns, account issues, and feature requests. You do not need a perfect taxonomy on day one - you can refine it as you learn what your customers actually ask about - but having a starting framework saves you from reclassifying hundreds of tickets later.
Enable the Tidio Ticketing System
Setting up the ticketing system in Tidio takes just a few minutes. The platform integrates ticketing directly into the same inbox where you handle live conversations.
Step 1: Navigate to Settings. Log into your Tidio dashboard and click the Settings gear icon in the left sidebar.
Step 2: Open the Ticketing section. Look for the Ticketing option within your settings panel. This is the hub for all ticket configuration - enabling the feature, setting default behaviors, and configuring how tickets display in your inbox.
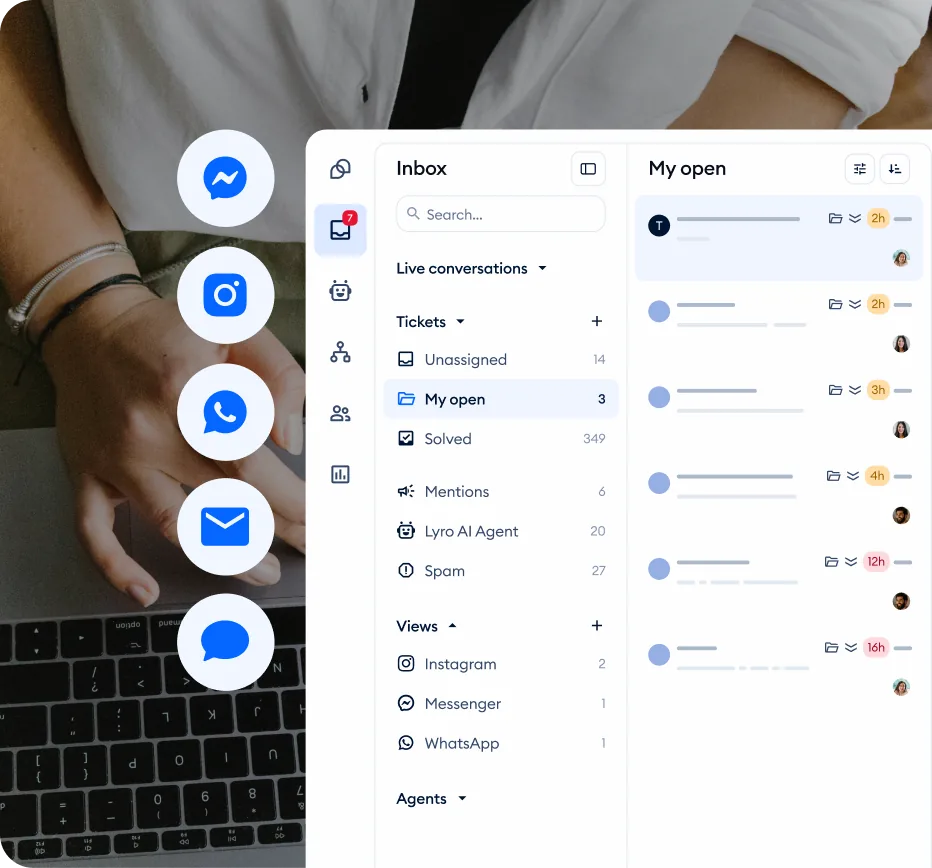
Step 3: Enable ticketing. Toggle the ticketing system on. Once activated, you will see a new Tickets section in your inbox sidebar alongside your regular conversation channels. Agents can now create tickets from any active conversation or start new tickets manually.
Step 4: Configure default ticket fields. Tidio sets up standard fields automatically - subject, priority, status, and assignee. Review these defaults and decide whether you need additional custom fields for your workflow. For example, if you run an e-commerce business, you might add an “Order Number” field that mirrors the same identifier in Shopify’s order API. If you provide software support, a “Product Version” field might be useful.
Step 5: Set up ticket statuses. The default statuses - Open, Pending, Resolved, Closed - work for most teams. If your workflow has additional stages (like “Waiting on Customer” or “Escalated”), you can customize the status options to match how your team actually processes issues.
Step 6: Save and test. Save your settings, then open your inbox and create a test ticket to confirm everything is working. Assign it to yourself, change the priority, add a note, and resolve it. This walkthrough takes two minutes and confirms the system is ready before real customer issues start flowing in.
How Do You Create Tickets from Conversations in Tidio?
The most common way tickets enter your system is through conversion from live chat conversations. When an agent realizes that a conversation requires tracking, investigation, or handoff, they convert it to a ticket without leaving the chat interface.
From an active conversation. While chatting with a customer, click the Create Ticket button (or the ticket icon) in the conversation panel. Tidio pulls the conversation context - customer name, email, conversation history - into the new ticket automatically. The agent adds a subject line that describes the issue, selects a priority level, and optionally assigns it to a specific team member or department.
From a resolved conversation. Sometimes you realize after closing a conversation that it needs follow-up. You can create a ticket from any conversation in your history, even ones that were previously marked as resolved. The conversation transcript attaches to the ticket so whoever picks it up has full context.
Manual ticket creation. For issues that arrive outside your chat channels - a phone call, an in-person complaint, a social media message - agents can create tickets manually from the ticket panel. Fill in the customer’s contact information, describe the issue, set the priority, and assign it. Manual tickets work exactly the same as converted ones, they just do not have an attached chat transcript.
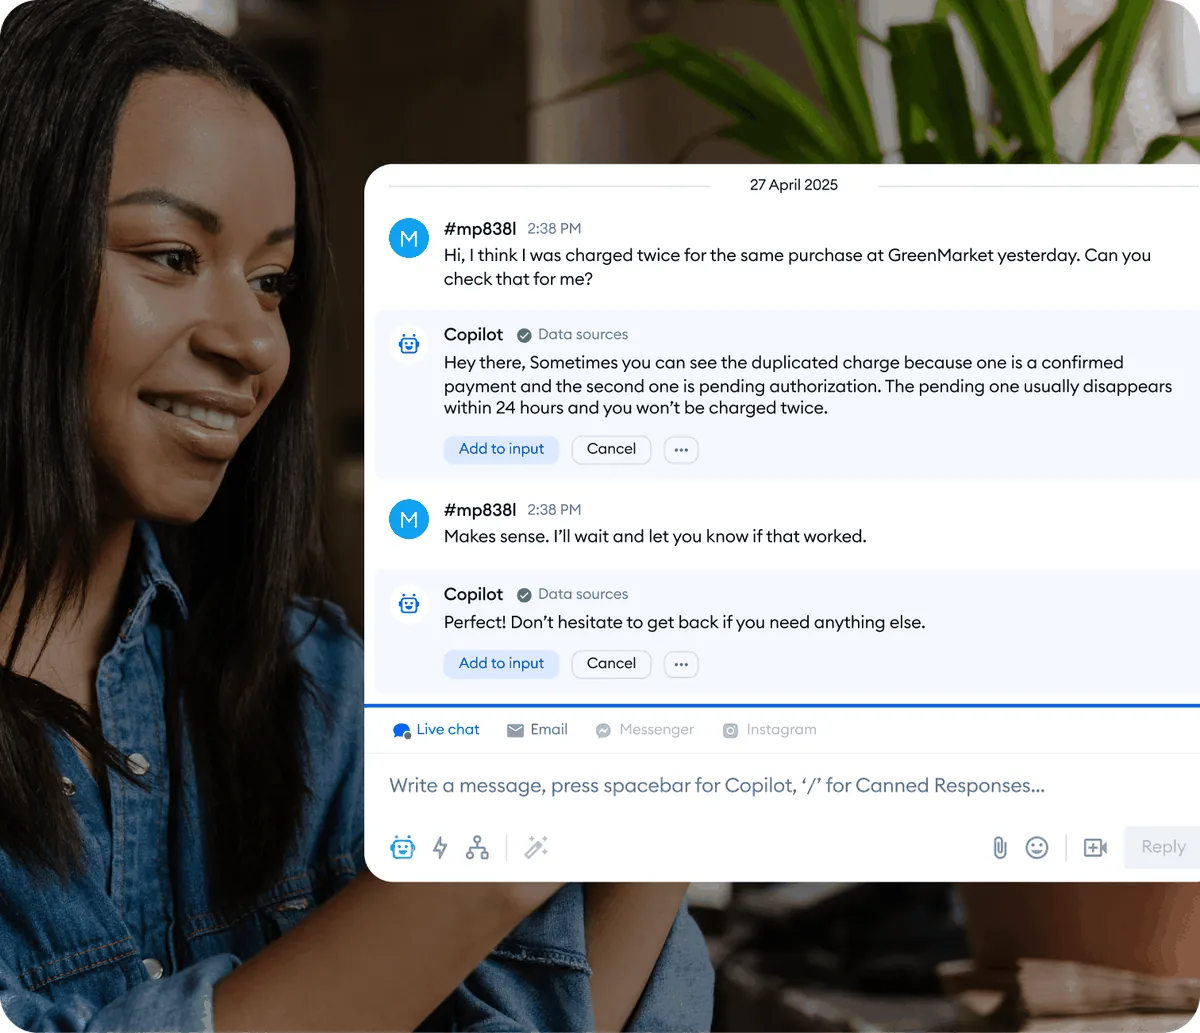
Bulk ticket creation from Lyro handoffs. If you are running Lyro AI - which uses Anthropic’s Claude models - and it transfers a conversation to a human agent, that agent can immediately convert the handoff into a ticket. This is particularly useful for issues that Lyro identified but could not resolve - the ticket captures both the AI conversation and the human follow-up in one place.
Best practices for ticket creation:
- Write subject lines that are specific enough to scan in a list. “Billing issue” is vague. “Double charge on March invoice - order #4892” is actionable.
- Set the priority at creation time, not later. If an agent has enough context to create a ticket, they have enough context to assess urgency.
- Add internal notes with any context that is not in the conversation transcript - what the customer sounded like emotionally, what you already tried, who else might need to weigh in.
Configure Custom Views
As your ticket volume grows beyond a handful per day, you need filtered views that let agents see exactly what requires their attention without scrolling through everything.
Create views by status. The most basic view separates open tickets from pending and resolved ones. Your “Active Work” view might show all tickets with status Open or In Progress. Your “Waiting” view shows tickets in Pending status where you are waiting on a customer reply or external input.
Create views by assignee. Each agent should have a “My Tickets” view that filters to only their assigned tickets. This is their personal work queue - the list they check first thing in the morning and work through during their shift. Team leads benefit from a view showing all unassigned tickets that need someone to pick them up.
Create views by priority. A “Critical and High” view surfaces urgent issues that need immediate attention. This view should be visible to team leads and managers at all times so nothing urgent sits unnoticed.
Create views by category or tag. If you tag tickets with categories like “billing,” “technical,” or “shipping,” create views for each category. This lets specialized agents focus on their area of expertise. Your billing specialist sees only billing tickets. Your technical support agent sees only technical tickets.
Combine filters for targeted views. The most useful views combine multiple filters - similar to Notion database views. “My open high-priority tickets” shows an agent exactly what they should work on next. “Unassigned technical tickets from the last 24 hours” shows a team lead what needs triage.
Priority and SLA Management
Priority levels and service level agreements turn your ticketing system from a simple to-do list into a managed workflow with accountability and deadlines.
Setting Up Priority Levels
Tidio supports multiple priority levels for tickets. Configure them to match the urgency patterns in your support operation.
Critical. The customer’s business is stopped or they are losing money right now. Examples: checkout is broken, account is locked, data appears to be lost. Target first response: under 15 minutes. Target resolution: under 2 hours. (Compare this to PagerDuty’s incident severity levels for incident-response framing.)
High. The customer has a significant issue that needs resolution today but is not an emergency. Examples: billing discrepancy, feature not working as expected, order shipped to wrong address. Target first response: under 1 hour. Target resolution: under 8 hours.
Medium. Standard support requests that should be handled within normal business operations. Examples: how-to questions that require investigation, feature requests, minor bugs that have workarounds. Target first response: under 4 hours. Target resolution: under 24 hours.
Low. Informational requests, feedback, or non-urgent questions that can wait. Examples: general product inquiries, documentation suggestions, feature feedback. Target first response: under 8 hours. Target resolution: under 48 hours.
Defining SLA Targets
SLA targets give you measurable goals for each priority level - the Atlassian guide to ITSM SLAs covers the canonical structure used across help-desks. Without them, “we will get back to you soon” means different things to different agents.
First response time. How quickly a customer receives a meaningful first reply after their ticket is created. This is the most customer-visible metric - people can tolerate a multi-day resolution if they know someone acknowledged their issue quickly.
Resolution time. How long from ticket creation to the issue being fully resolved. Track this alongside first response time, because a fast first response followed by a week of silence is worse than no response at all.
Set realistic targets. Base your SLA targets on your actual team capacity, not aspirational goals. If you have two agents covering support during business hours, promising a 15-minute first response on everything is a recipe for missed SLAs and stressed agents. Start conservative and tighten your targets as your team grows or as Lyro AI takes over more of the simple question volume.
Routing and Assignment Rules
Manual ticket assignment works fine when you have two or three agents, but it breaks down as volume grows. Routing rules automate the process of getting tickets to the right person.
Round-Robin Assignment
The simplest routing approach distributes incoming tickets evenly across all available agents. If you have four agents online, each gets every fourth ticket. This works well when all agents have similar skill sets and can handle any ticket type.
When to use it: Small teams where every agent handles everything. The goal is even workload distribution.
Skill-Based Routing
Route tickets to agents based on the ticket’s category or content. Billing questions go to agents who know your pricing and payment systems. Technical issues go to agents with product knowledge. Shipping questions go to agents with logistics access.
Set up skill tags for agents. In your Flows automation settings, tag each agent with their areas of expertise. When a ticket comes in with a matching category, it routes to an agent with the relevant skill tag.
Fallback routing. Always configure a fallback rule for tickets that do not match any skill-based route. Unrouted tickets sitting in a general queue with no owner are the most common source of missed SLAs.
Time-Based Routing
Route tickets differently based on time of day or day of week. During business hours, tickets go to your human team. After hours, tickets either queue for the morning shift or trigger an automated acknowledgment letting the customer know when to expect a response.
Combine with Lyro. During off-hours, Lyro can handle the initial response and information gathering while creating a ticket for your team to pick up in the morning. The customer gets an immediate interaction and your agents get a pre-triaged ticket with context when they start their shift.
Email-to-Ticket Pipeline
Not all customer issues arrive through live chat. Email is still a primary support channel for many businesses, and connecting it to your Tidio ticketing system ensures that every customer touchpoint feeds into the same workflow.
Connect Your Support Email
Step 1: Set up email forwarding. Configure your support email address ([email protected]) to forward incoming messages to Tidio. The exact method depends on your email provider - most support standard forwarding rules that copy incoming messages to a Tidio-specific email address. (See Gmail’s forwarding documentation or Outlook’s forwarding documentation for the major providers.)
Step 2: Configure email-to-ticket rules. In your Tidio settings, define how incoming emails become tickets. You can set default priority, auto-assign to a specific agent or queue, and apply category tags based on keywords in the subject line.
Step 3: Set up auto-responses. When an email creates a ticket, send an automatic acknowledgment to the customer confirming that you received their message and providing a ticket reference number. This sets expectations and gives the customer something to reference if they follow up.
Step 4: Test the pipeline. Send a test email to your support address and verify that it appears as a ticket in your Tidio inbox with the correct priority, assignment, and auto-response. Check the customer-facing acknowledgment email for correct branding and information.
Managing Email Tickets
Email tickets behave slightly differently from chat-converted tickets. The conversation flow is asynchronous by nature - the customer sends an email, you reply, they reply back hours or days later. Tidio threads these exchanges into the ticket so the full email chain is visible alongside any internal notes your team adds.
Reply from Tidio. When you respond to an email ticket from within Tidio, the customer receives your reply as a standard email from your support address. They do not need to log into any portal or interface - the interaction feels like normal email from their perspective.
Merge duplicate tickets. Customers sometimes email about the same issue multiple times or follow up on a chat conversation via email. When you spot duplicates, merge them into a single ticket to keep the conversation history clean and avoid two agents working on the same problem.
How Do You Measure Resolution Metrics in Tidio?
Ticketing gives you structured data that chat conversations alone cannot provide. Use these metrics to identify bottlenecks, justify staffing decisions, and demonstrate improvement over time.
Core Metrics to Track
Average first response time. How quickly your team acknowledges new tickets. Segment this by priority level - your critical ticket response time matters more than your overall average.
Average resolution time. How long tickets stay open from creation to resolution. Look for outliers - tickets that take dramatically longer than average often reveal process problems or knowledge gaps that affect more than just that one ticket.
Ticket volume by category. Which types of issues generate the most tickets? If “billing questions” account for 40% of your volume, investing in a better billing FAQ or training Lyro to handle billing inquiries could cut your ticket load significantly.
SLA compliance rate. What percentage of tickets meet their priority-level response and resolution targets? Track this weekly. A compliance rate below 80% means your targets are either unrealistic for your current team size or your routing is sending tickets to the wrong people.
Reopen rate. How often do resolved tickets get reopened because the issue was not actually fixed? A high reopen rate - above 10% - suggests agents are closing tickets prematurely or solutions are not addressing the root cause. (Industry benchmarks like Zendesk’s customer service statistics can help you compare your numbers to peer averages.)
Agent workload distribution. Are tickets distributed evenly or is one agent carrying twice the load? Uneven distribution leads to burnout and inconsistent response times.
Using Metrics for Improvement
Weekly review. Set aside 30 minutes each week to review your ticketing dashboard. Look at trends rather than individual numbers - a single bad day is noise, but a three-week decline in SLA compliance is a signal.
Monthly reporting. Share a monthly summary with your team: total tickets, average resolution time, top categories, SLA compliance, and CSAT scores linked to ticketed conversations. Transparency about performance creates shared ownership of improvement. Connect your ticketing metrics with your CSAT tracking data for the full picture.
Quarterly capacity planning. Use three months of ticket volume and resolution time data to forecast whether your current team can handle projected growth (the Atlassian capacity planning guide covers a similar approach). If ticket volume is growing 15% per month and resolution times are creeping up, you know you need to either add agents, expand Lyro’s capabilities, or streamline your processes before the backlog becomes unmanageable.
Pro Tips
Use internal notes aggressively. Every ticket should have an internal note explaining what was tried, what the current status is, and what needs to happen next - similar to the “ADR” pattern from Architectural Decision Records. When a ticket gets reassigned or picked up after a shift change, the receiving agent should never have to re-read the entire conversation to understand where things stand.
Create ticket templates for recurring issues. If you handle the same type of request regularly - refund processing, account upgrades, password resets - build ticket templates with pre-filled fields, standard internal notes, and linked canned responses. Templates reduce handling time and ensure consistency.
Set up notifications for SLA warnings. Configure alerts that fire when a ticket is approaching its SLA deadline - not when it has already breached. A warning at 80% of the target time gives the assigned agent or team lead time to prioritize the ticket before it becomes a missed SLA. The University of Utah’s SLA primer is a useful refresher on the underlying ITIL framing.
Close the loop with customers. When a ticket is resolved, send a brief message confirming the resolution and inviting the customer to reopen the ticket if the issue returns. This small step reduces “Is this actually fixed?” follow-up messages and builds trust.
Tag tickets for product feedback. When customers report issues that are really feature requests or product improvement suggestions, tag those tickets separately. A monthly review of feature-request tickets gives your product team direct customer input without requiring a separate feedback tool like Canny or Productboard.
Review Lyro-to-ticket handoff patterns. If many tickets originate from Lyro handoffs on the same topic, that topic is a candidate for knowledge base improvement. Strengthening Lyro’s ability to handle that question type reduces ticket volume at the source. Check the Lyro Knowledge Base Guide for optimization strategies.
Frequently Asked Questions
Can I convert any Tidio conversation into a ticket?
Yes. Any live chat conversation - whether it started with a human agent, was handled by Lyro and then transferred, or came through your connected messaging channels - can be converted into a ticket. Click the ticket icon in the conversation panel, add a subject line and priority, and the full conversation history attaches to the new ticket automatically. You can also create tickets from previously resolved conversations if you realize follow-up is needed.
What happens to the chat conversation after I create a ticket from it?
The original conversation stays in your inbox alongside the new ticket. The ticket links back to the conversation so you can reference the original exchange at any time. Any new messages the customer sends through chat about the same issue can be added to the existing ticket to keep everything in one place. This prevents the common problem of having a chat thread and a separate ticket with no connection between them.
How do I handle tickets that require input from someone outside my support team?
Add an internal note to the ticket describing what you need from the external party, then change the ticket status to Pending or a custom status like “Waiting on Internal.” This keeps the ticket visible in your queue without marking it as resolved. When the external input arrives, update the ticket, change the status back to Open, and proceed with the resolution. If your organization uses a separate project management tool, include the ticket reference number when requesting external input so responses can be tracked back to the right ticket.
Can Lyro AI create tickets automatically?
Lyro can be configured to create tickets when it encounters questions it cannot resolve. When Lyro reaches the boundary of its knowledge and hands off to a human agent, that handoff can automatically generate a ticket with the AI conversation history attached. This ensures that no customer issue falls through the cracks during the transition from AI to human support. Configure this in your Lyro Tasks and Actions settings.
What is the difference between “Resolved” and “Closed” ticket statuses?
Resolved means the agent believes the issue is fixed and has communicated the resolution to the customer. Closed means the ticket is fully complete - the customer confirmed the resolution or a set period has passed without the customer reopening the issue. Many teams use an auto-close rule that moves Resolved tickets to Closed after 48 or 72 hours of inactivity. This two-step process gives customers a window to reopen the ticket if the resolution did not actually work, while ensuring your ticket queue does not fill up with resolved-but-technically-still-open items.
How do I prevent duplicate tickets for the same issue?
Before creating a new ticket, search your existing tickets for the customer’s email address or name. If a ticket already exists for the same issue, add the new information as a note on the existing ticket rather than creating a duplicate. When duplicates do slip through - and they will, especially when customers contact you through multiple channels - merge them into a single ticket to consolidate the conversation history and avoid two agents working on the same problem independently.
Want to learn more about Tidio?
Related Guides
- Getting Started with Tidio - Account setup and initial configuration
- Tidio CSAT Tracking Guide - Measure customer satisfaction across ticketed and chat conversations
- Tidio Copilot Agent Assist - AI-powered suggestions to speed up ticket responses
- Tidio Canned Responses and Macros - Pre-written templates for faster ticket replies
- Tidio Team Management - Roles, departments, and routing rules
Related Reading
External Resources
- Tidio Official Website - Plans, signup, and product pages
- Tidio Pricing - Tier limits relevant to ticketing
- Tidio AI Agent (Lyro) - Lyro overview and ticket-handoff capabilities
- Tidio Help Center - Ticket setup tutorials and SLA configuration
Related Guides
- AI Chatbots Customer Service Setup: Complete 2026 Guide
- AI Customer Service Automation: Chatbots vs Agentic AI
- Tidio Abandoned Cart Recovery: Automation Workflows
- Tidio Analytics Dashboard: 2026 Walkthrough for Teams
- Tidio Canned Responses and Macros for Faster Support
- Tidio Copilot Agent Assist: AI-Powered Agent Assist Guide
- Tidio CSAT Tracking: CSAT Tracking and Improvement
- Tidio Ecommerce Chatbot: Tidio Chatbot Flows for Ecommerce
- Tidio Ecommerce Support Automation: Automation Best
- Tidio Flows Automation: Visual Automation Builder Guide