Google Slides makes it easy to build clean, shareable presentations - but once you send a deck to someone who was not in the room, it loses its voice entirely. The recipient gets slides without context, data without explanation, and a call to action without the persuasive argument that makes it land. A murf ai google slides voiceover solves this directly: with Murf AI, you write a script, generate professional voiceover audio in Murf Studio, export the files, and insert them into each Google Slide so the narration plays automatically when a viewer opens the deck. New to Murf? Start with the Murf AI getting started guide.
The result is a presentation that communicates fully without requiring a live meeting - useful for async sales pitches, remote team updates, accessibility compliance, and any situation where your audience advances through slides on their own schedule. This guide covers the complete murf ai google slides voiceover workflow from a blank script to a narrated, shareable deck. The official Google Slides audio insertion documentation covers the platform-side mechanics, and the Murf text-to-speech tutorial covers core voice generation.
Why Add a Murf AI Google Slides Voiceover
The case for narrated presentations goes beyond convenience. There are three specific situations where a murf ai google slides voiceover delivers results that plain slides cannot.
Async presentations replace live meetings. When you cannot schedule a synchronous meeting - distributed teams, international time zones, busy executive calendars - a narrated deck delivers the full presentation on the recipient’s schedule. They hear the argument, the tone, the emphasis on key points, and the next-step ask in exactly the order you intended. A static deck sent by email leaves all of that interpretation to the reader. The Murf Studio workspace walkthrough covers the editor environment used throughout this guide.
Accessibility requirements. Google Slides content is increasingly subject to accessibility standards in corporate, government, and educational contexts - the W3C WCAG guidelines document the relevant criteria for multimedia content. Audio narration benefits viewers with visual processing differences and those who absorb information better through hearing than reading. Adding voiceover to your slides is a practical accessibility improvement that also improves comprehension for all viewers.
Retention and persuasion. Research on multimedia learning consistently shows that combining visual content with synchronized narration improves information retention compared to text-only slides. Sales decks, investor pitches, and training presentations all benefit from audio - recipients remember more of the argument and are more likely to take action.
Murf AI makes adding voiceover practical by removing the recording bottleneck. Treat this guide as a Murf AI tutorial for presentations: there is no microphone setup, no background noise management, no retakes, and no audio editing software required, because the Murf AI voice generator handles every step in the browser. You write, generate, and export - then insert into Google Slides.
What You Will Need
Before starting, confirm you have the following.
Murf AI account - The free tier includes 10 minutes of voice generation and is enough to complete this murf ai google slides voiceover free of any upgrade fee, with a short presentation - the Murf free plan tips guide covers how to stretch those minutes. For ongoing production, the Creator plan ($29/month) gives you 2 hours of generation per month and commercial usage rights. Compare options on the Murf pricing page.
Google account with Google Slides access - A standard Google account gives you full access to Google Slides at no cost. No paid Google Workspace plan is required to insert audio into slides.
Your presentation - Have your Google Slides deck at a near-final stage before generating audio. Finalizing the visuals first means you can write narration that matches the actual content on each slide. Revising slides after recording forces you to regenerate audio for any changed slide.
Your script or slide notes - You do not need a finished script before you open Murf Studio, but having your talking points or slide notes ready speeds up the scripting step. For a 10-slide presentation with two to three sentences per slide, expect 300 to 500 words total.
Prerequisites
- A modern web browser (Chrome recommended for both Murf and Google Slides)
- Your Google Slides presentation open and finalized, or nearly finalized
- Slide notes or talking points prepared for each slide you want to narrate
- Headphones for reviewing audio during fine-tuning
No microphone, recording equipment, or audio editing experience is required.
Step 1: Create Your Voiceover Script Slide by Slide
Log into your Murf AI account and navigate to Murf Studio. Open your Google Slides presentation alongside Studio in a separate browser tab so you can reference the visual content of each slide as you write.
Create a new Murf project:
- Click “Create New Project” from the Murf dashboard
- Select “Voiceover” as the project type
- Name the project to match your presentation - something like “Google Slides - Q2 Sales Deck - Narration” keeps your Murf library organized when you are managing multiple decks
- Choose your primary language from the dropdown
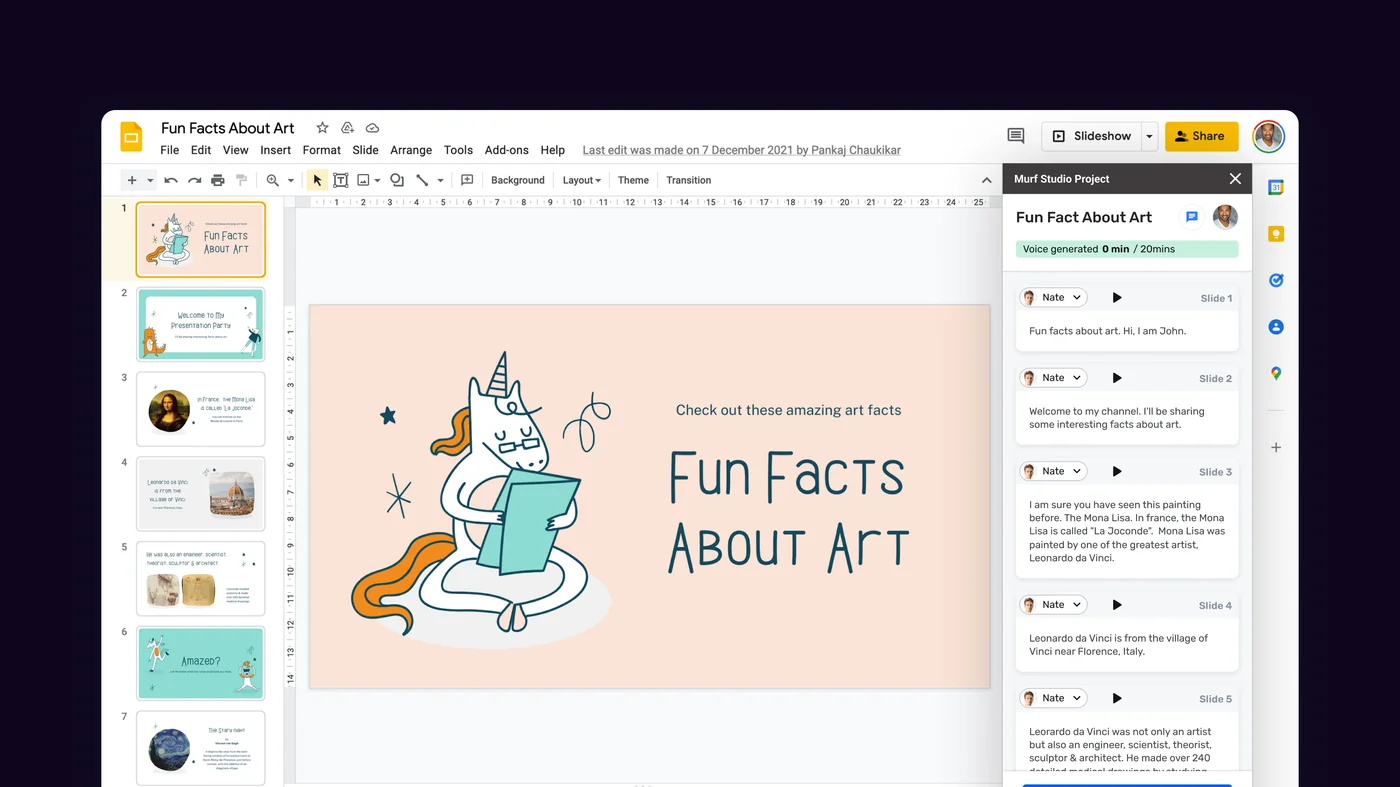
Write narration block by block:
Murf processes text in blocks, with one block per paragraph. For Google Slides voiceover, the most effective structure is one Murf block per slide. This gives you independent control over each slide’s narration - if Slide 5 needs a slower delivery or a longer pause at the end, you adjust that block without touching anything else.
Structure each block to narrate what the slide cannot show:
- Slide title slides - Briefly introduce the topic and frame what the viewer is about to see. One to two sentences is enough.
- Content slides - Narrate the key insight, not just a repetition of the bullet points. The viewer can read the text; your voiceover adds the argument, the context, or the significance.
- Data slides - State the number, then explain what it means. “We closed 47 enterprise accounts in Q1 - up 31 percent year over year - which puts us ahead of the annual target by one quarter.”
- Closing and CTA slides - Be direct. State the ask, the timeline, and the next step clearly.
Formatting rules that improve AI delivery quality:
- Write sentences of 12 to 18 words. Long, clause-heavy sentences lose natural phrasing mid-delivery.
- Avoid abbreviations. Write “for example” not “e.g.”, “three minutes” not “3 min”.
- Use active voice. “This feature reduces onboarding time by 40 percent” delivers better than “Onboarding time is reduced by 40 percent with this feature.”
- Write numbers in a way that reads naturally aloud. “Three hundred thousand” rather than “300K” or “$300,000” - Murf handles numeric parsing, but spelled-out numbers give you more control over phrasing.
Once your script is written or pasted, Murf divides it into blocks automatically based on paragraph breaks. Review the block divisions and manually split any block containing more than two to three sentences so each Murf block maps cleanly to one slide.
Step 2: Generate Audio in Murf Studio
With your slide-by-slide script entered, select a voice and generate the audio.
Choose a voice:
The Murf voice selection tips guide covers full audition methodology before you commit.
- Open the voice browser from the right panel in Studio
- Filter by language and then by use case - “Presentation” and “Professional” categories surface voices suited for slide deck narration
- Audition each candidate voice with a sentence from your actual script, not the generic sample preview
- For professional and business presentations, male and female voices in the “Professional” category project authority without sounding overly formal
- For training and educational content, “Conversational” voices maintain listener engagement over longer narration sequences
Generate and review your output:
- Click “Apply to Project” on your selected voice to apply it across all blocks
- Click “Generate All” to produce audio for the entire script simultaneously
- Listen through the complete output from the first block to the last before making any adjustments - identify systemic issues first, such as pace consistently too slow or delivery too flat, before fixing individual blocks
Fine-tuning settings for presentation narration:
- Speed - A baseline of 1.0x works well for most business presentations. If your deck is high-energy or targeted at a younger audience, 1.05x to 1.1x adds momentum without rushing the delivery. The Murf pacing pauses speed tips guide covers per-section speed strategy.
- Pauses between slides - Insert a pause of 700ms to 900ms at the end of each block. This creates a natural break that the viewer hears as a slide transition cue.
- Pauses for emphasis - For key figures, insights, or calls to action, insert a 400ms pause immediately before the critical phrase. The brief silence draws attention before the important line arrives. The Murf pacing pauses speed tips guide covers timing strategy in depth.
- Emphasis on key terms - Select specific words that anchor each slide’s argument and apply the emphasis control. Use one to two emphasis markers per block maximum to avoid over-stressing delivery. The Murf pronunciation and emphasis guide walks through the controls.
- Pronunciation corrections - If any product names, company names, or technical terms are mispronounced, use the pronunciation editor to specify the correct phonetic form - the Murf custom pronunciation guide covers the Say It My Way feature. Corrections save per block and apply consistently across the project.
Step 3: Export Your Audio Files
When you are satisfied with the narration for all slides, export the audio in the format Google Slides requires.

Google Slides accepts MP3 and WAV audio file uploads. MP3 is the recommended format - it produces compact file sizes while maintaining quality that is fully appropriate for presentation narration. The Murf export formats and quality guide covers when to choose each format.
Export settings for Google Slides:
- Click the Export button in the top right of Studio
- Select “Audio Only” as the export type
- Choose MP3 format
- Set the sample rate to 44100 Hz - this is standard for web and presentation audio
- Decide whether to export as a single combined file or as individual files per slide
Single file vs. per-slide files:
- Single combined file - Export the entire narration as one MP3 file. This works well for short presentations where you want the narration to play continuously from the first slide, and where you will attach it to the first slide in Google Slides with no per-slide controls needed.
- Per-slide files - Export each slide’s block as an individual MP3 file. This gives you full control in Google Slides - each slide plays its own audio, the narration pauses automatically when a slide advances, and you can update individual slides without regenerating the full narration. For most Google Slides workflows, per-slide export is the more practical approach.
To export per-slide, select each block individually in Murf Studio and use the block-level export option. Name each file with the corresponding slide number: slide-01-narration.mp3, slide-02-narration.mp3, and so on. This naming convention makes insertion into Google Slides straightforward.
Download all exported files to a single folder on your computer before switching to Google Slides.
Step 4: Insert Audio into Google Slides Slide by Slide
Open your Google Slides presentation. You will insert a separate audio file onto each slide that has narration.
Upload audio files to Google Drive first:
Google Slides inserts audio from Google Drive rather than directly from your local drive. Before inserting, upload all of your exported MP3 files to a Google Drive folder.
- Open Google Drive in a new browser tab
- Create a new folder named after your presentation - for example, “Q2 Sales Deck - Audio Files”
- Upload all of your per-slide MP3 files to this folder
- Wait for all uploads to complete before returning to Google Slides
Insert audio onto each slide:
- In Google Slides, click the slide thumbnail in the left panel to navigate to the slide you want to narrate
- In the top menu, click Insert → Audio
- The “Insert audio” dialog opens and shows your Google Drive files. Navigate to the folder where you uploaded your MP3 files
- Select the MP3 file that corresponds to the current slide - for example,
slide-01-narration.mp3for Slide 1 - Click Select to insert the audio onto the slide
- A speaker icon appears on the slide, indicating audio is attached
Repeat steps 1 through 6 for each slide that has narration. Work through the deck in order to avoid missing any slides.
Positioning the speaker icon:
The speaker icon is visible by default when the presentation is in edit mode and when viewers are playing the presentation. You can drag the speaker icon to any position on the slide. Common placements are the bottom-left corner or bottom-right corner, where it does not overlap slide content.
Step 5: Set Playback Options
After inserting audio on all slides, configure playback settings so the narration plays automatically without requiring the viewer to click the speaker icon.
Access playback settings:
- Click the speaker icon on the first slide to select the audio element
- A “Format options” panel opens on the right side of the screen. If it does not open automatically, right-click the speaker icon and select “Format options”
- In the Format options panel, expand the “Audio playback” section
Recommended settings for async narrated presentations:
- Play - Set to “Automatically” so the audio starts playing as soon as the viewer advances to that slide. This is the most important setting for async presentations - “On click” requires the viewer to actively click the speaker icon, which many viewers will not do.
- Stop on slide change - Check this option. When the viewer advances to the next slide, the current slide’s audio stops and the next slide’s audio begins automatically. Without this setting enabled, audio from the previous slide continues playing while the next slide is visible.
- Hide icon when presenting - Check this option to remove the speaker icon from the viewer’s view during presentation playback. The narration still plays; the icon simply does not appear on screen. This produces a cleaner presentation experience. The icon remains visible in edit mode so you can still select and adjust the audio element.
- Loop - Leave unchecked. Looped narration on a presentation slide creates a confusing viewer experience.
Repeat the playback settings configuration for the audio on every slide. Each audio element maintains its own playback settings independently.
Test the complete presentation:
For a Canva-based equivalent, see the Murf Canva integration guide.
Click View → Present to enter full-screen presentation mode and advance through each slide. Confirm that audio plays automatically on each narrated slide, stops cleanly on slide change, and that the speaker icon is hidden during playback. Note any slides where the narration feels too long or too short relative to the time a viewer needs to absorb the visual content, and return to Murf Studio to adjust those blocks if needed.
Integration Recipes
Here are three practical applications of the murf ai google slides voiceover workflow for specific use cases.
Recipe 1: Async sales deck
Build your pitch deck in Google Slides with one key insight per slide, minimal text, and strong visuals. The Murf marketing voiceover workflow covers tone and CTA delivery for sales contexts. Write narration in Murf that surfaces the argument behind each slide - the story behind the data point, the customer outcome behind the feature, the ask behind the timeline. Use a professional voice at 1.0x speed with 800ms pauses at the end of each block. Export per-slide MP3 files, insert them into Google Slides with auto-play and stop-on-change enabled, and hide the speaker icon during presentation. Share the deck as a view-only link. Prospects who watch the narrated version receive the full persuasive argument on their own schedule, without a meeting.
Recipe 2: Educational presentation for students
The Murf eLearning course narration guide covers educator-specific narration patterns. For classroom presentations or course materials, write narration that explains concepts at a deliberate pace with explicit signposting - “First, we will cover… Next, notice that… This is important because…” Use a clear, measured voice in Murf’s “Educational” or “Conversational” category at 0.95x to 1.0x speed to give students time to process each idea before the slide advances. Insert audio per slide with auto-play enabled. Share the presentation as a student-accessible link so learners can pause and replay individual slides as needed. This workflow is particularly effective for students who benefit from hearing content explained rather than just reading it.
Recipe 3: Async team update or project brief
The Murf team collaboration guide covers multi-seat workflows. For internal team updates where a live meeting is not warranted, record the status deck as a narrated Google Slides presentation. Keep narration tight - two to three sentences per slide, focused on the decision or information each slide conveys. Use a conversational voice at 1.05x speed for a natural, meeting-like delivery without the scheduling overhead. Export per-slide MP3 files and insert them with auto-play enabled. Share the presentation link in Slack or email. Team members who are in different time zones or have conflicting schedules receive the full briefing without attending a meeting.
Frequently Asked Questions
Does Google Slides support audio natively?
Yes. Google Slides supports MP3 and WAV audio file insertion via the Insert → Audio menu, as documented in the official Google Slides audio help article. Audio files must be stored in Google Drive before they can be inserted into a presentation. There is no native recording or voice generation capability in Google Slides - you need an external tool like Murf AI to create the audio files, then insert them into your slides.
What is the maximum audio file size Google Slides accepts?
Google Slides does not publish a specific file size limit for audio, but Google Drive’s general upload limit applies. In practice, a per-slide MP3 narration file for a typical slide runs 500KB to 2MB depending on the length of the narration. A full 20-slide presentation narrated at standard quality produces total audio under 30MB, well within any practical limit. If you encounter issues, confirm the files are in MP3 format and stored in Google Drive before attempting to insert them.
Can viewers replay audio on individual slides?
Yes. When a viewer is watching the presentation and a slide’s audio is playing, they can click the speaker icon (if visible) to pause, rewind, or replay the audio for that slide. If you have hidden the speaker icon during presentation, viewers will not see playback controls while in presentation mode, but they can still pause playback by pressing the spacebar. In edit mode, all audio controls are accessible via the speaker icon regardless of the “hide icon” setting.
How do I update narration for a single slide without redoing the whole deck?
Open the original Murf project and navigate to the block corresponding to the slide you want to update. Murf saves your voice selection, speed, and pause settings in the project - just revise the script text for that block and regenerate it. Export the updated block as an individual MP3 file, return to Google Slides, click the speaker icon on the relevant slide, delete the existing audio element, and use Insert → Audio to add the new file. Configure the playback settings again for the replaced audio. The rest of the deck is unchanged.
Do audio files play when a presentation is shared as a published web page?
Yes. When you publish a Google Slides presentation to the web via File → Share → Publish to web, audio elements with auto-play settings will play as the presentation advances through slides in the published format. Test the published link after setting up playback options to confirm audio plays as expected, since behavior can vary slightly between presentation mode and published web format.
Want to learn more about Murf AI?
Related Reading
Related Guides
- Getting Started with Murf AI
- Murf Studio Interface Walkthrough
- How to Clone Your Voice with Murf AI
- Murf Text-to-Speech Tutorial
- Choosing the Right AI Voice in Murf
- Murf AI Emotion Controls
- Murf AI Pronunciation and Emphasis
- Mastering Pacing in Murf AI
- Murf MultiNative: Multilingual Voiceovers
- Murf AI Dubbing Walkthrough
- AI Voiceover for YouTube Videos: Murf Workflow
- Murf AI eLearning Narration: Educator’s Guide
- Murf AI Canva Integration
- Murf Falcon API Tutorial
- Murf AI Free Plan Tips
- Murf AI Voice Changer Guide
- Murf AI Podcast Intro Guide
External Resources
- Murf AI Pricing Plans - Compare Free, Creator, Pro, Business, and Enterprise tiers
- Murf AI Text-to-Speech Overview - Voice library, languages, and platform capabilities
- Google Slides Audio Support - Official documentation on inserting audio into a presentation
Related Guides
- AI Voiceover Corporate Training With WellSaid Labs
- AI Voiceover for YouTube Videos: Murf Workflow Guide 2026
- AI Voiceover Tips: Making Synthetic Voices Sound Human
- ElevenLabs Getting Started: Complete Beginners Guide
- ElevenLabs Voice Cloning Tutorial: Complete 2026 Guide
- Luma Dream Machine Video Tutorial 2026: Text-to-Video & Ray3
- Murf AI Canva Integration: Add Voiceovers to Designs
- Murf AI Custom Pronunciation: Say It My Way Guide (2026)
- Murf AI Dubbing: Complete Walkthrough | Complete Guide 2026
- Murf AI eLearning Narration: Educator's Guide | Review 2026